Category Archives: How To

How To articles are focused on the very specific skills and steps necessary to perform a wilderness related task. Given the name of our company and website, a focus on How To should not surprise you.

How To Treat Circulatory Shock

Shocked Face - By Yakov Levi
Shocked Reaction: By Yakov Levi

The shocking thing about shock is that most of us have a fairly muddled understanding of it.  When we think of shock what often comes to mind is a sudden anxiety producing surprise – something that generates a reaction to fight, flight, or faint.  It might be the way you feel after:

  • a near miss traffic accident
  • seeing a loved one bleeding at an alarming rate
  • realizing your required final examination was yesterday, not today

Types of Shock

Psychological Shock

This type of shock may be psychological (of the mind) rather than physiological (of the body).  Because of this, it can also be seen by others as a weakness.  Not everyone goes into shock at the sight of blood.  Experiencing this type of shock may suggest your mind is just not tough enough to take it.  Chuck Norris would never experience psychological shock.

Stress and anxiety can produce very real shock-like symptoms such as elevated heart rate, rapid respiratory rate, and pale clammy skin.  The treatment for this shock is to calm the patient.  For example you may:

  • have them lie down
  • cover them with a blanket
  • gently elevate their feet
  • if appropriate, provide fluids

The cynical view is that you simply need to baby this baby.  Viewing shock as a mere mental weakness is dangerous, however, because there are in fact physiological causes of shock with very similar symptoms, which are indeed life threatening.

Circulatory Shock
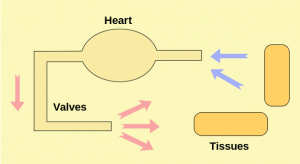
Circulatory System
Simplified Circulatory System

Circulatory shock, also sometimes referred to as medical shock, is caused by a lack of perfusion.  The root for perfusion is French and it means to “pour over.”  Perfusion simply means pushing blood under pressure to bathe our cells in oxygen.  In the wilderness a lack of bathing is usually a bad thing, but a lack of oxygen bathing the cells is a very bad thing.  This is not simply a weak state of mind, but a real threat to life.

Proper perfusion relies on a successful cardiovascular systems.  We need to keep oxygenated blood pumping through our body.  The proper medical terms may be confusing, but the the basic concepts are fairly clear:

  • Is there enough volume of blood in the body?
  • Is the pump (heart) working properly?
  • Are the pipes (vascular system) clear and properly sized?

Hypovolemic Shock

Hypovolemic shock means you do not have enough volume of blood for successful cell bathing.  This may be caused by things such as bleeding, dehydration, vomiting, diarrhea, and sever burns.  Quickly addressing the cause of the lack of blood volume is critical for treatment.

Cardiogenic Shock

Cardiogenic shock means the heart is not adequately pumping blood through the system.  This could be caused by a heart attack or a heart trauma.  Treating this root cause in the field may not be practical, so evacuation is key.

Distributive (or Vaseogenic) Shock

Distributive shock means the blood is not being distributed properly through the vascular system.  Proper blood pressure is key to distribution, and under normal operation your pipes can constrict or expand to adjust to the right pressure.   There are a variety of situations which can disrupt this system, such as nerve damage (neurogenic), infection (septic) or allergic reaction (anaphylatic).  Where possible, treating the cause is critical.  For example infections may need antibiotics and anaphylaxis may require antihistamines and epinephrine.

 The Shocking Reality

Regardless of the cause of shock (failure of volume, pump, or pipes) left untreated patients will slide down a predictable slippery slope.  Early treatment is critical to prevent this progression towards death.  The progression has three major states:

  • Compensatory Shock
  • Progressive (or Decompensatory) Shock
  • Refractory (or Irreversible) Shock

Compensatory Shock

Compensatory shock means there is something seriously wrong, but your body is managing to keep your blood pressure relatively normal by doing some pretty crazy things.  In other words, it is frantically “compensating.”   This compensation comes in the form of higher respiratory rates, higher heart rate, tighter vascular constriction – anything to keep oxygenated blood bathing those cells.

Progressive (or Decompensatory) Shock

In progressive or decompensatory shock, your body is beginning to lose the battle.  Your compensation efforts to keep blood pressure normal are failing.  Less oxygen is getting to the cells, including your brain, and aggressive treatment to turn things around is critical before it is too late.

Refractory (or Irreversible) Shock

Bummer.  The title pretty much gives this one away.  At some point the lack of oxygen causes your organs to die, including your brain.  Some refer to this stage as the “slow circling of the drain.”  It is  irreversible and death is inevitable.   On a brighter note, you won’t be alone in this journey, because by definition everyone will eventually get here.  It is essentially how we die.

General Shock Treatment
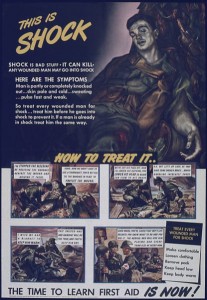
Shock Poster - Circa 1945
Shock Treatment – 1945

Shock treatment should not to be confused with shock therapy, which you may want after reading that last depressing paragraph. There are things that can be done to treat circulatory shock (or at least delay if for a significant number of years).  Much of the treatment for physiological shock is the same as for psychological, with one significant addition:

  • treat the cause
  • have them lie down
  • cover them with a blanket
  • gently elevate their feet
  • if appropriate, provide fluids

Patients who do not show vital sign improvements should be evacuated.

Conclusion

There are a wide variety of causes of circulatory shock, but they can all progress down a slippery slope towards death.  To be on the safe side, anytime someone appears in distress, you should probably assume shock and treat for it until proven otherwise.  Besides, who doesn’t enjoy a calming voice, a warm blanket, and chance to lie down with their feet up.

Disclaimer:  I am not a doctor, and do not pretend to be.  For more information, ask your doctor, and check medical online references, such as www.webmd.com.

How To become a certified Wilderness First Responder (WFR)

What is a WFR?

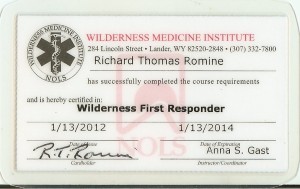
WMI Wilderness First Responder Certification Card
WMI Wilderness First Responder

A Wilderness First Responder, sometimes referred to as a “woofer,” is an individual trained and certified to provide extended emergency medical care in a wilderness setting.  In comparison think of an urban first responder as focused on providing care during the “golden hour” – that critical hour of support before definitive care arrives, usually in the form of an ambulance carrying equipment, EMTs and paramedics.  By definition a wilderness setting is more than an hour from care and depending on the remoteness of the setting and communication systems available, it may be days or weeks away.  The nature of the wilderness activity may also limit the equipment and resources available.  For example long distance backpackers, mountain climbers, and whitewater kayakers do not usually have readily available things like traction splints, backboards, spinal collars, blood pressure cuffs, or automated external defibrillators (AEDs).  A Wilderness First Responder has to be very creative and resourceful when providing extended care.

Who is a WFR?

Woofer’s are usually individuals who are in leadership positions for outdoor adventures such as backpacking, mountain climbing, river rafting, skiing, and similar remote activities.  They may be in roles such as trek leader, river guide, or ski patrol.  Many reputable outdoor organizations now require Wilderness First Responder certification for their outdoor employees.

Who certifies WFRs?

There is no one certification body for Wilderness First Responders.  A variety of medical and wilderness training organizations appear to have co-operated fairly well in creating training and testing standards.  A typical WFR certification requires 72-80 hours of classroom and practice training, as well as both a written and practical exam.  Although all certified individuals are called WFRs, the actual certification is controlled and tracked by the organization providing the training.  Most require re-certification within 2-3 years, and not all organizations recognize the others certification for re-certification, although the major players (such as NOLS/WMI, SOLO, and WMA) appear to play nice.

What content is covered?

Each training provider’s website offers a detailed course outline, but some common themes include:

  • Patient Assessment System
  • CPR
  • Head and Spine Injuries
  • Bone and Joint Injuries
  • Soft Tissue Injuries
  • Shock
  • Common Illnesses
  • Treatment Planning
  • Evacuation

Topics are covered with a combination of lecture and mock rescue practices, some of which are very elaborate and surprisingly realistic.

What is the difference between the organizations?

Because the schedule and location worked for me, I certified through NOLS/WMI.  They are the only organization with which I have first hand experience, but during my research I found very strong advocates for each of the major players and some of the smaller ones.  I suspect their curriculum and exams are similar.  One piece of advice I got early on was to focus on the quality of the instructor, as that would potentially have a greater impact on my experience.  Although I agree, I am not sure how practical that is to implement.  I lucked out and ended up with an excellent instructor.

I recommend you do your own research, but to help you out I offer these potential major providers and their own website positioning statements:

  • National Outdoor Leadership School – Wilderness Medicine Institute  https://www.nols.edu “The nationally recognized standard in wilderness medicine education”
  • Remote Medical International  https://www.remotemedical.com  “We are a medical and rescue services company specializing in remote areas.”
  • Stonehearth Open Learning Opportunities (SOLO)  https://www.soloschools.com/  “The oldest continuously operating school of wilderness medicine in the world.”
  • Wilderness Medical Associates https://www.wildmed.com  “The definitive wilderness course in medical leadership and critical thinking for outdoor, low-resource, and remote professionals and leaders.”

You should also consider quality smaller regional providers, although cross-organizational re-certification options may be more limited.  As an example, in the San Francisco Bay Area Foster Calm has an excellent reputation.  There are probably others in your area.

Conclusion

After experiencing through mock rescues and practice the wide variety of things that can go seriously wrong in the wilderness, I find myself wanting to add more and more things to my first aid kit.  The reality, of course, is that my pack has limited space, but my brain is still relatively empty.  The sign of a good “woofer,” I guess, is a continued focus on practice and skills rather than gear.  I think being a Wilderness First Responder is a life long journey, but one I am willing to undertake.  Besides my kids would probably say, a life long journey for me might not in fact be all that long.  I may now be a First Responder, but somehow the my kids always have the last response.

How To Measure Up

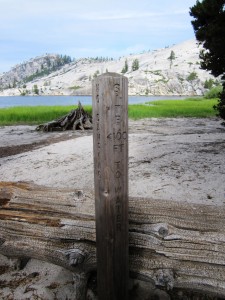
100 Feet from Water Marker
100 Feet From Water Marker

Although a strong urge to perform math is probably not what drove you to leave civilization, there are times when guess-ti-mating is an important skill:

  • Your wilderness permit says your campsite must be at least 100 feet from water.
  • You are  wondering if that tree branch is really high enough to counter-balance a bear bag 10-12 feet off the ground.
  • Your son wants to jump of a cliff into the lake and you want to know how high it is, either for bragging rights or for potential insurance paperwork.
  • You have just finished setting up your camp and you want to know how much time you have before the sun sets behind that ridge line.

Whatever your reason, the skills to estimate measurements in the wilderness can come in handy.

Body Part Measurements

Okay, that may not have come out right.   I am not referring to what you do in the privacy of your own home.  I am however referring to how you can use socially acceptable body parts for quick measurements in the wilderness.

Body part measurement has been used for centuries.  It did not take long to figure out that humans come in a variety of sizes, including different than me.   To solve the standardization challenge important people, such as kings, were used for “good measure.”

  • Inch = tip of King’s finger to first knuckle
  • Hand = width of King’s hand, about 4 inches
  • Foot = length of King’s foot, heel to big toe
  • Yard = tip of King’s nose to thumb, or some say circumference of kings waist (though that would certainly be subject to inflation)
  • Common Cubit = distance from King’s elbow to tip of middle finger

Since you probably will not be bringing a king with you to the wilderness, knowing your own standard measures can be helpful.  If nothing else you will be more convincing when describing that spectacular rainbow trout:

I am telling you it was four hands wide.  The thing was practically a cubic.

Pacing Yourself

For wilderness measuring, knowing the distance of your own stride is probably the most helpful.   Certainly your stride will vary depending on the steepness of the grade and the burden of your load, but with a little practice you can acquire a fairly consistent “measuring stride.”

Stretch a tape measure across the ground, then casually walk ten steps.  Don’t exaggerate your steps, don’t reach for maximum distance, just keep it very natural.  After 10 steps look down, identify the distance, and divide by 10.  (If you do really enjoy math, take 13 steps and divide by 13 instead).   For me, in 10 steps I travel about 25 feet, or 2.5 feet per step.  So a campsite for me should be about 40 steps from the water (40 x 2.5 = 100 feet).

Measuring Up

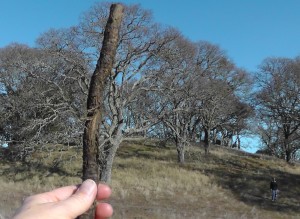
Stick Turn Measuring (Stick Up)
Stick Turn Measurement

It is a lot easier to pace out a distance on level ground than to say walk up a tree or the side of a cliff.  To convert a height to a pace-able ground distance, you can use the “stick tilt” method.  Hold a stick at arms length such that the tip of the stick is at the top of what you are measuring and your hand grips the stick at the bottom.  By keeping your arm fully extended you keep the visible ratio of the stick and the object being measured consistent.

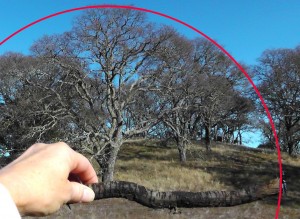
Stick Turn Method (Stick Down)
Pace off distance to measure height

Once you have the correct ratio, tilt the stick 90 degrees (from vertical to horizontal) so you can pace off the distance on the ground.  It works best if you have a helper you can position (a little to the left, no no your other left, that’s it, perfect) otherwise you need to look for visual clues on the ground to pace if off yourself, all the while wondering why you no longer have any friends.

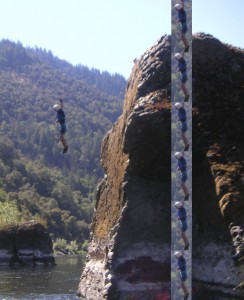
How many Brian’s tall is it?

Cliff is 5 & 1/2 Brian's High
5 & 1/2 Brian’s High

Another technique is to use an object or person of a known height, positioned the same distance away.  For example if Brian is standing at the top of the cliff you can use him as a reference.  To improve the accuracy, position yourself a reasonable distance back from the cliff.  (Besides, if Brian happens to fall off the cliff you will be able to time how long it takes him to reach the bottom,  figuring acceleration at 32 feet per second per second.) Holding a stick at arms length you can measure how many “Brian’s” tall the cliff is.  If Brian is 6 feet tall, you multiple the number of Brian’s by 6 to get the height.  Five and a half Brian’s equals 33 feet (5.5 X 6 = 33).  Personally, I recommend bringing someone along who is 10 feet tall, making the math much easier.

New Meaning to Wrist Watch

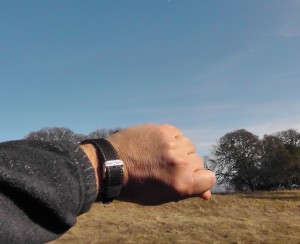
Fist at arms length
Fist at arms length = 10 degrees

A quick estimate of time can be made with your hand stretched at arms length.  The earth rotates 360 degrees in a 24 hour period.  In other words, every hour is represented by 15 degrees of movement across the sky.   Assuming you have relatively normal body proportions, a fist at arms length is equal to about 10 decrees of the sky.  (Yes, if you are a big person your fist will be bigger, but your arms will also be longer, so the ration is about the same for most people.)

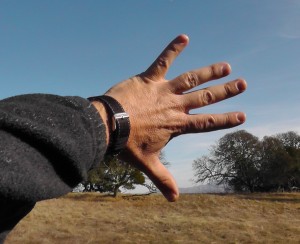
Estimating degrees with open fingers
Open Fingers at arms length = 20 degrees

If your fingers are spread out as wide as possible, they cover about 20 degrees of the sky.  Whatever method you are using, test it by measuring from the horizon to straight over your head.  If you have worked it out correctly, that should be 90 degrees.

When you are setting up camp or preparing dinner and wondering how long the sun will be up, you can simple measure the distance between the sun and the horizon in degrees.

  • 30 degrees means you’ve got about 2 hours
  • 15 degrees means you only have 1 hour
  • A beautiful sunset means you’re pretty much screwed