Category Archives: How To

How To articles are focused on the very specific skills and steps necessary to perform a wilderness related task. Given the name of our company and website, a focus on How To should not surprise you.

How To Name A Mountain

Sunrise on Fisherman's Peak
Sunrise on Fisherman’s Peak

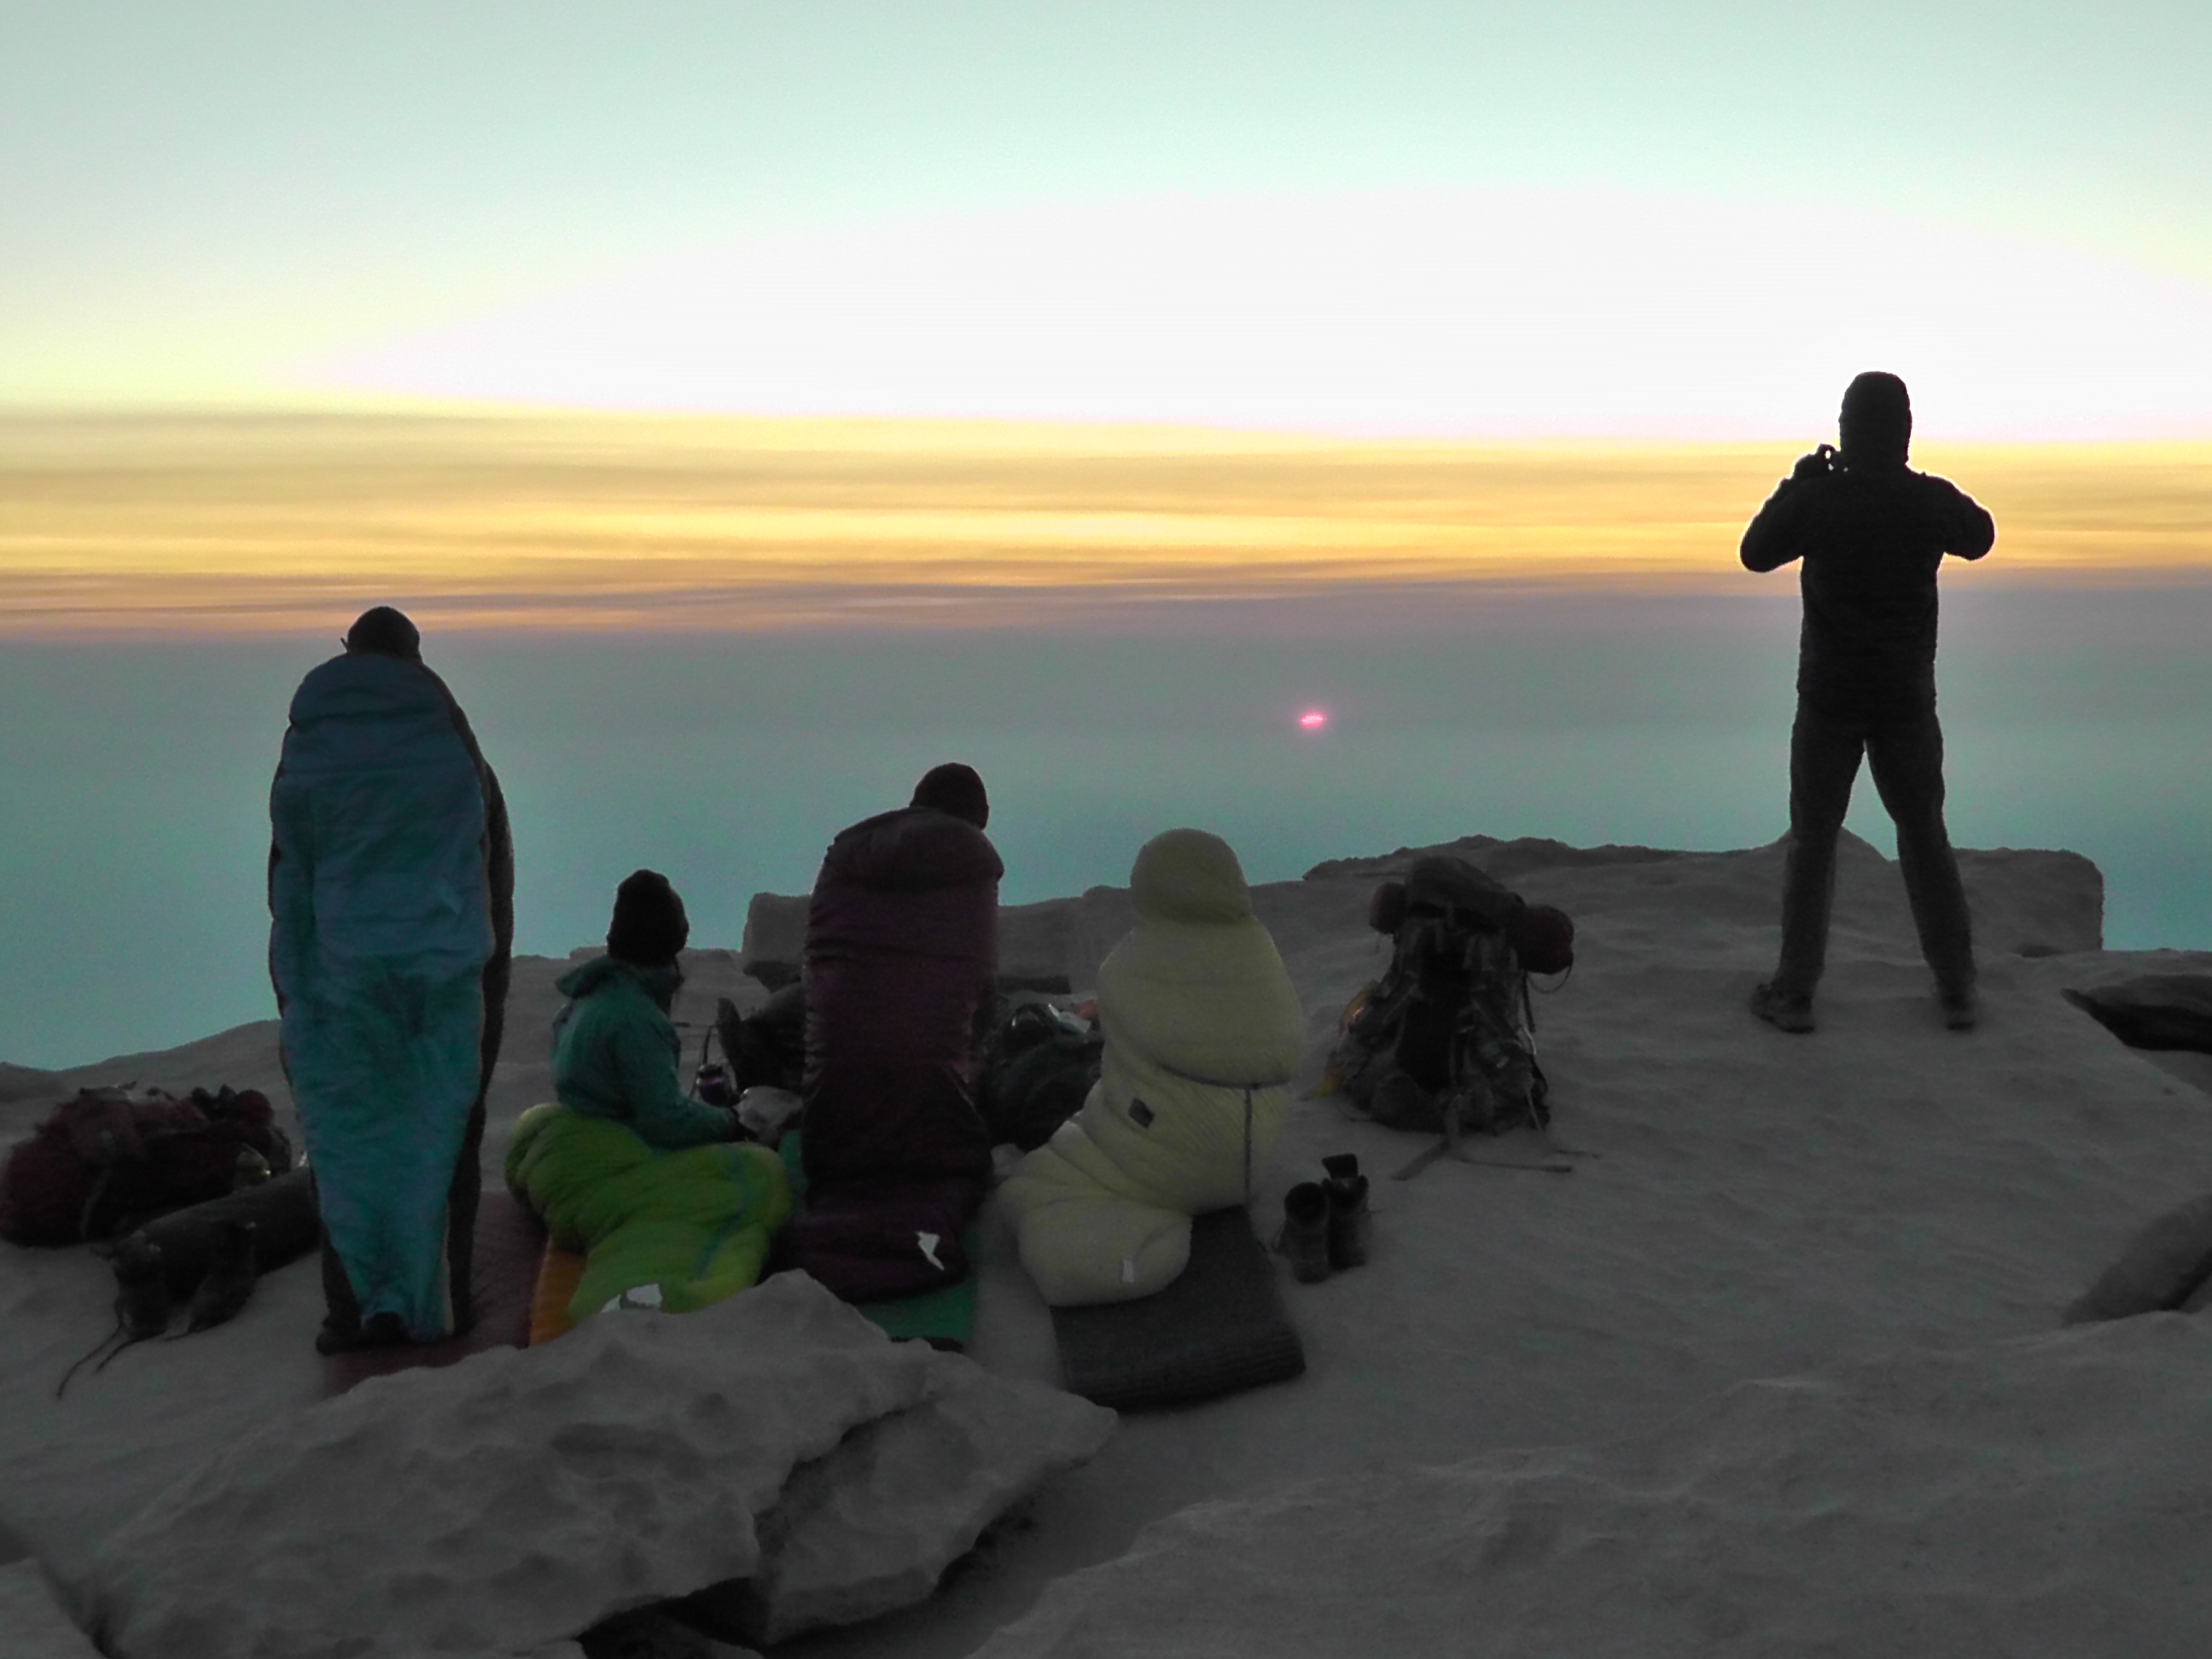
During my Pacific Crest Trail (PCT) thru-hike, I took a very popular side trip to the top of Fisherman’s Peak. Perhaps not surprising, this peak was named in honor of the three fishermen, who on August 18, 1873, were the first ever to reach its summit. Surprising to me, however, is the limited respect accorded these high climbing anglers: Charles Begole, A. H. Johnson, and John Lucas. After all, at 14,494 ft, Fisherman’s Peak is the highest mountain in the contiguous United States.

“Wait,” I hear you saying. “I thought Mount Whitney was the highest peak.” Well, yes, I suppose the mountain is also known by that name. This mountain naming business can be kind of tricky.

According to the Geonames website:

The U.S. Board on Geographic Names is a Federal body created in 1890 and established in its present form by Public Law in 1947 to maintain uniform geographic name usage throughout the Federal Government.

Because serious naming conflicts needed to be resolved,

President Benjamin Harrison signed an Executive Order establishing the Board and giving it authority to resolve unsettled geographic names questions.

Perhaps because of his commitment to resolving identity crises, Benjamin Harrison is now the official name for two elementary schools, a post office, a state park and natural preserve, a mine, and a memorial bridge – at least according to theGeographic Names Information System (GNIS) database.

So why do most people associate the highest continental peak with Whitney rather than the first-to-summit fishermen?  It may be as simple as who you know.

Josiah_Whitney
Josiah Whitney

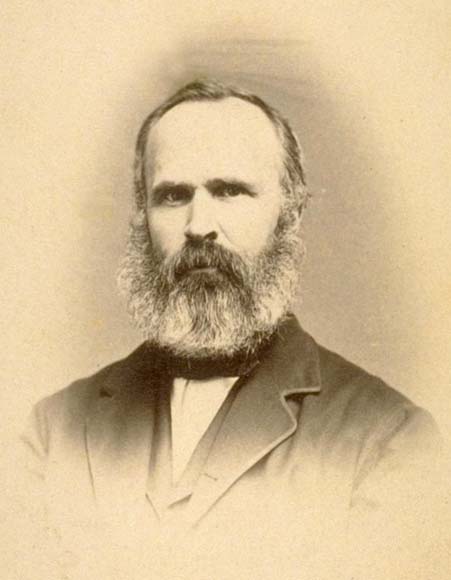
Professor Josiah Dwight Whitney of Harvard was tasked with the 1860 California State Geological Survey. He hired a variety of scientist and explorers to help, including William H Brewer, Charles F Hoffmann, William More Gabb and Clarence King. You may also know them as: Mount Brewer, Mount Hoffmann, Mount Gabb, and just to mix things up – Clarence King Mountain.  It must have been exhausting hiking around naming mountains after each other.

Clarence King
Clarence King

It was Clarence King who, in an apparent 1864 career enhancing move, suggested his boss Whitney for the highest peak. To explain King’s relationship with the summit, you could sum it up as: D’oh!

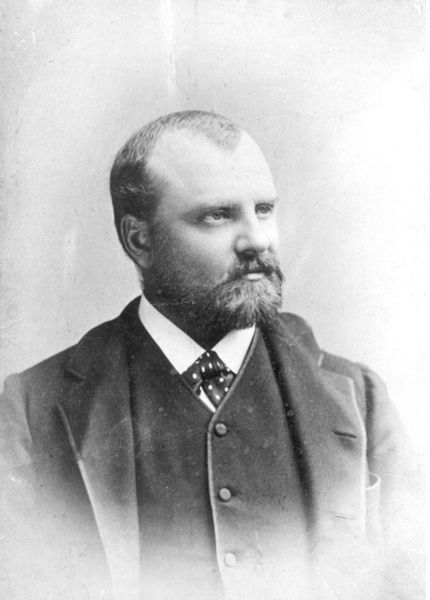
In 1864 King attempted to reach the summit and failed.

In 1871 he returned and climbed the wrong summit, peaking out on present day Mount Langley. He wrote extensively about his first-to-ascend Whitney adventure, only later in 1873 to have rival Goodyear let all the air out of his tired tale.

In 1873, King rushed back to climb the correct peak, to claim his place in the history books. With apologies to Gale Sayers, this new book could be titled I Am Third, as he appears to have been beaten out by both the fishermen and the team of Hunter and Crapo.

King sheepishly added the following to the Mount Whitney chapter of his book Mountaineering in the Sierra Nevada:

The preceding pages were written immediately after my return from Mount Whitney, and without a shadow of suspicion that among the sea of peaks half seen, half storm-hidden, I could have missed the true summit.

In addition to the peak, I think he missed the point. King’s problem was that he returned from Mount Langley instead of Mount Whitney.

Given his failure as King of the hill, you might assume he gave ground on claiming the naming rights. Perhaps those rights belonged to the fishermen, who simply climbed the correct mountain the first time, probably encumbered with extra poles and a bucket of worms.

Because of King’s less than perfect navigation skills, the lower peak, now known as Mount Langley, was at that time identified as Mount Whitney.

In Exploration of the Sierra Nevada, Francis P. Farquhar (aka Mount Farquharrecalls a letter written by Goodyear to the Inyo Independent on July 30, 1888:

It appears that when Prof. Whitney was in Owens Valley himself in 1872 for the purpose at studying the effects of the great earthquake of March 26th of that year, he became unpopular with a good many people in the Valley, some of whom took a very strong personal dislike for him. When, therefore, a year later it was suddenly discovered that a lower mountain had for three years been called Mt Whitney by mistake some of these people thought it could be a fine opportunity for revenge upon the man whom they disliked by making his name stick to the lower peak and calling the highest one something else.

Mount Whitney versus Fishermen's Peak
Mount Whitney versus Fishermen’s Peak

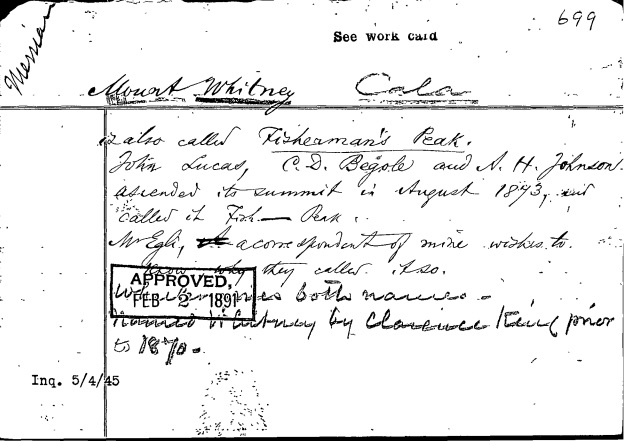
It was not until Feb 2, 1891 that the U.S. Board on Geographic Names stepped in and called the fight, in an apparent technical knock out. The hand written decision card can be found on the Geonames website.

Fisherman’s Peak was then relegated to the status of “variant name,” a sort of purgatory waste bin for losing names, recorded in the GNIS database, but never again to be used on any map or official document.

King’s bungling did manage to get his boss some bonus recognition. Mount Langley, the one he accidentally climbed, has a variety of variant names, including False Mount Whitney, Mount Whitney Number One, and Old Mount Whitney.

Although Mount Whitney may have beaten back Fisherman’s Peak, the winds of change continue to howl through the mountains. On October 1st, 2014, white male McKinley was knocked off his (highest in the entire USA) mount, in favor of the local native name Denali. Could white male Whitney be far behind?

The competition for Denali was as high as the mountain.  In addition to Mount McKinley, other now discarded “variant” names include: Bolshoy, Bulshaia Gora, Bulshaya Gora, Bulshoe, Churchill Peaks, Deenaalee, Deenadhee, Deenadheet, Deenalee, Deghilaay Ce’e, Deghilaay Ke’e, Delaykah, Denadhe, Denagadh, Denaze, Dengadh, Dengadhe, Dengadhi, Dengadhiy, Densmore’s Mountain, Densmores Peak, Dghelaay Ce‘e, Dghelaay Ke’e, Dghelay Ka‘a, Dghili Ka‘a, Diinaadhi, Diinaadhii, Diinaadhiit, Diinaalii, Diinaazii, Diineezi, Din-al-ee, Din-az-ee, Doleika, Doleyka, Mount Denali, Mount Doleika, Mount McKinley, North Peak, North, Peak Mount McKinley, South Peak, South Peak Mount McKinley, Tenada, Tenda, Tennaly, To-lah-gah, Traleika, Traleyka.

I was disappointed that Boaty McBoatface did not even make the consideration list.

If local names are to be given preference, then shouldn’t we pay attention to what the California natives called the highest continental peak now known as Whitney? To answer this, Wikipedia quotes from Judge William B. Wallace memoirs:

The Pi Ute [Paiute] Indians called Mt. Whitney “Too-man-i-goo-yah”

Given the extremely high number of people fighting each year for a permit to climb Mount Whitney, the name “Too-man-i-goo-yah” seems “too-good-i-think-yah.” I can only offer it up with a degree of amused skepticism. It reminds me of the public relations disaster when a KTVU anchor read the supposed names of four pilots who crash landed Asiana flight 214 in San Francisco: “Sum Ting Wong,” “Wi Tu Lo,” “Ho Lee Fuk,” and “Bang Ding Ow.”

“Perhaps we do need policies on appropriate names,” mused Ray Cyst Baphuny.

In 1997, The United States Board On Geographic Names released a 56 page document titled the PRINCIPLES, POLICIES, AND PROCEDURES: DOMESTIC GEOGRAPHIC NAMES

It includes ten naming policies.

  • POLICY I: NAMES BEING CONSIDERED BY CONGRESS
  • POLICY II: NAME CHANGES
  • POLICY III: COMMEMORATIVE NAMES
  • POLICY IV: WILDERNESS NAMES
  • POLICY V: DEROGATORY NAMES
  • POLICY VI: USE OF DIACRITICAL MARKS
  • POLICY VII: NAME DUPLICATION
  • POLICY VII: USE OF VARIANT NAMES
  • POLICY IX: LONG NAMES
  • POLICY X: NAMES OF NATIVE AMERICAN ORIGIN

I suspect POLICY VIII addresses secret names, such as Area 51, and therefore had to be redacted. To make up for it, however, there are two POLICY VII’s, one of which is titled… wait for it… NAME DUPLICATION?!

Our focus, however, is on how to name a mountain. Our attention, therefore, is logically drawn to POLICY IV: WILDERNESS NAMES, which regrettably states:

Within wilderness areas, the U.S. Board on Geographic Names will not approve proposed names for unnamed features, names in local use but not published on a base series map, or unpublished administrative names used by administering agencies, unless an overriding need exists, such as for purposes of safety, education, or area administration.

Name proposals commemorating persons are discouraged…

Before you get discouraged, remember:

… a person must be deceased at least 5 years before a commemorative proposal will be considered.

In other words, you will have plenty of time to get over the injury of your untimely death, before you have to face the insult of your mountain name rejection.

NOTE: A newer version of Principles, Policies and Procedures was released in 2016.

How To Survive Hugging A Tree

A Tree to HugWhen most of us hear the term tree hugger, we think of an environmentalists.  Whether we hear the term as derogative or  effective is not the point.  The point is that the tree hugger is trying to save the tree.

There is another tree hugging movement whose objective is not to save the tree, but to save the tree hugger.   The focus of this movement is not big huggers, but little huggers, between the age of 7 and 11.

In Feb of 1981, 9 year old Jimmy Beveridge and his two brothers hiked a popular nature trail on Palomar Mountain.  Merely a half mile from where their parents were preparing lunch,  Jimmy became separated.  The brothers, assuming Jimmy was racing them back to camp, quickly returned.  Jimmy did not.   After 4 days of intensive search and rescue (SAR) efforts, Jimmy’s body was discovered 2 miles from camp.  He had died from hypothermia.

Tragedy and grieve are sometimes catalysts for noble plans of action.  Ab Taylor, who participated in Jimmy’s search, was determined to do something to prevent similar tragedies.  Working with a team, he created the Hug-a-Tree and Survive program targeted at very basic survival skills.  In 2005 Ab donated the rights to the program to the National Association for Search and Rescue.

The principle of the program is simple:  A lost child who stays put is easier to  find than one who keeps moving.  Initial searches typically focus where the child was last seen.  If the child keeps moving, that information becomes less and less helpful.  Once an area is searched, resources focus on other locations.  A moving child may enter a previously searched area, making the search and rescue more difficult.

Targeted for young children, the Hug A Tree program is designed to be delivered in about 30 minutes.   It typically covers these main points:

  • Hug A Tree:  When you are lost stay put.  Find a tree and hang on to it.  Since the tree won’t move, neither will you.  A tree is alive, just like your pet.  You can  name your tree and talk to it.  It will help protect you.
  • Always Carry a trash bag and whistle:  A trash bag is easy to carry in your pocket and easy to make into a jacket.  It will provide you protection from water and cold.  A whistle is easy to carry and can be heard from a longer distance than yelling.
  • Your family will not be angry with you:   Anyone can get lost.  Do not feel embarrassed or ashamed.  Do not hide from your rescuers.  Get comfortable and remain calm, knowing help is on the way.  Your family loves you and will be very happy to see you.
  • Make yourself big: Make it easier for others to find you.  Wear bright colors.  Blow your whistle.  Make a big X in the ground with sticks or rocks.
  • Animals are afraid of humans: If you hear a noise blow your whistle or yell.   If it is an animal, it will run away.  If it is a rescuer, you will be found.
  • You have hundreds of friends looking for you: If you hear people yelling your name they are not angry.  They are trying to find you.  Yell back, or blow your whistle.

Parents also play a key role.  The messages for parents include:

  • Prevention is key.  Make sure your child understands the main points of the program.  Help arrange a presentation at your school, church, or youth organization.
  • Young BackpackerFootprint your child.  A small piece of aluminum foil can be used to create a imprint of your child’s shoe.  Place the foil on a towel and have your child step on it.  It can be an extremely valuable tool for searchers.
  • Call for help right away.  If the child is moving, the search area will be expanding exponentially.  The sooner the search starts, the more quickly the child will be found.
  • Be available for interviewing.  Searchers rely on clues to find lost children.  You are the best source for clues.  Be available to provide them.

There is nothing scarier to a parent than the loss of a child.  A few minor steps can significantly increase the odds of a happy reunion.  If your child remembers to hug a tree, you may very well get another chance to hug your child.

How To Navigate With Your Magnetic Dog

Is your dog a pointer?  I don’t mean his breed, I mean his read.  Can he read the earth’s magnetic field and point the way like a compass?  Well that’s exactly what the folks at Frontiers in Zoology were interested when they published this dog-goned research abstract: Dogs are sensitive to small variations of the Earth’s magnetic field.

Dog Magnetic Squat
Photo Credit: Jenny Ricken

Other serious researchers have explored the magnetic sensitivity of various animals, including migrating birds and rodent-hunting red foxes.   Even cows and deer have shown a preference for north/south orientation.

So what exactly did this Czech Republic/German study find?

Dogs preferred to excrete with the body being aligned along the North-South axis under calm MF [magnetic field] conditions.

They do, they do indeed.

This directional behavior was abolished under Unstable MF [magnetic field]. The best predictor of the behavioral switch was the rate of change in declination, i.e., polar orientation of the MF.

After observing backpackers struggle for years with compass orientation, I am absolutely astonished that dogs can not only calculate declination, but can actually detect small changes in it.  Let’s see, for 17 degrees westing, do I subtract or add that to the heading?  It’s gotta be add, right? 17 plus 354, that’s like what 371 degrees? Wait it can’t be more than 360, so… oh, doggy excrement!

Besides revealing their incredible math skills, what’s the big deal about compass dogs? According to this latest report, it is all about availability:

Dogs are widely available experimental subjects all over the world and can easily be trained to react on diverse sensory stimuli.

Clearly they don’t  mind defecating in public, plus many show a willingness to eat their own poop.  Perfect for this study. So how serious was this research?  How’s this for commitment:

We measured the direction of the body axis in 70 dogs of 37 breeds during defecation (1,893 observations) and urination (5,582 observations) over a two-year period.

In order to appreciate the scope of this effort, I conducted research on my own three cats.  Ninety-seven percent (97%) of the time my cat’s prefer to poop unobserved, most likely in the neighbors yard.  When trapped indoors, regardless whether the litter box was oriented on a North-South or East-West axis, they manage to fling all the litter onto the laundry room floor.  I trust this puts to rest any questions regarding my contribution to science.

Given the nature of this magnetic study on dog defecation and urination, it may prove difficult to maintain a straight face while reviewing.  I tested myself by reading the entire study, and frankly struggled in a few sections:

The direction (u) and length (r) of the (grand) mean vector and the p-value of the Rayleigh uniformity test as well as the sample size are given next to each diagram.

P-value? Sample size? In the same sentence?

Pooling is justified in this case because samples for respective dogs have comparable sizes.

And here I thought pooling was the expected result of urination. And apparently sample size does matter… so lay it out there big fella.

Navigation in the wilderness can be quite a challenge, so help of any kind would be greatly appreciated.  Exactly how dependable at navigation are man’s best (and becoming even “bester”) friends?  The research shows dogs are only good at it when the magnetic field is calm.  I’ve personally never felt a magnetic storm, so its gotta be calm most of the time, right?  Well it turns out:

MF is calm only about 20% of the daylight period.

Bummer.  I am not great at math, but I think that means dogs would be wrong something like 80% of the time.  Coincidentally, that is about the average rate of error for most backpackers using a compass. Is there any good news in this study?

Typically, the daily declination comprises westward-shifts in the morning and eastward-shifts in the afternoon, while the magnetic field is rather stable at night.

Great, while I am in my tent thrashing through nightmares about which direction to travel in the morning, the dog’s out pooping directions in the dark. If I brought my cats, I could at least figure out which way it is to my neighbor’s yard.

How to Keep Them in Stitches

Readily available technology, known as photo stitching, is allowing casual photographers to easily create amazing images.  The technical terms used vary by vendor, but to the lay person they end up sounding pretty much like:

Really cool 3D virtual reality things you can spin around in and look at everything from your feet to directly over your head.

If you have not yet seen this technology, you should.  Like the Street View in Google Maps, you can slip into a 3D virtual bubble and look around.  But rather than being of popular street locations driven by a Google car, these are micro bubbles usually created by individuals in strange or remote locations.  They can be inside a museum, an office building, or be deep in the wilderness.

For backpack planning, the possibilities are intriguing.  My middle son loves to backpack but prefers solid granite to lose shale, and he wants inviting water features such as cascades and falls.  A quick pop into a virtual bubble gives us a realistic view of the surroundings.  Google Earth provides us high level visualization, but these photo stitches are micro level.

How Are Photo Stitches Created?

On a Yosemite backpacking trip we were resting near a wooden bridge which spans the Merced river.  A man approached and sat down on the other side of the river, apparently waiting.  For what we had no idea.  Our powers of laziness far exceeded his powers of patience, and he eventually resigned himself to our continued presence.  He ambled onto the center of the bridge, pulled out his smart phone, and began taking a series of photos in an arching and overlapping pattern.

Well, we were in stitches.  That’s not to say we were laughing, though we might have been, but we were being stitched, as in photo stitched.  Once I realized, I apologized for ruining his visual knitting. He simply smiled and said he was using Microsoft‘s Photosynth™ application.  He went on to say that in about a month we should go to Bing Maps, find this bridge, and there find a 3D panorama of us on our lazy rear ends.  Okay, I added that rear ends part.

Photosyth: Relaxing At FootbridgeFrankly, I was not sure I could remember my name in a month’s time, let alone to come to this bridge on Microsoft’s Bing Maps.  Apparently, the thought of seeing myself sprawled for eternity in a virtual wilderness wonderland was powerful indeed.  For I did remember to come.  I found the bridge and spun myself around on it like a whirling dervish.  I zoomed in and out and eventually landed on my chillaxing virtual self.  I marveled.  Not at the amazing technology, but rather at how happy and relaxed I seemed.

And yet I somehow also felt violated.  There I was, happy to be in a place I had worked so hard to reach.  Nearing the end of what had been 2 weeks of rigorous backpacking, I was marveling at the raw beauty.  Much of my thrill, I now admit, coming from the realization that very few people in the world have ever seen this place.  And of those who have, they certainly earned it… made painfully clear by the sweat on their brows, and a little less clear in other places.

Mousing around in my virtual wilderness, I realize that every common sofa spud within an arms reach of a computer can now come play here too.  Not only can they see what I saw without any effort, but they can do so with the smiling approval of virtual me!  I click on virtual me in an attempt to make him protest: “You have to earn this!”  But oblivious virtual me remains blissfully silent.

Upon further examination, however, I realize this virtual world is not an entirely accurate representation of what I worked so hard to see.  For example, notice the legs to the right and below me.  They are missing a torso and head.  I am pretty sure I would have remembered that.  The good news, however, is that in the lower left part of the frame, near the waters edge, there appears a head missing a torso and legs.  This virtual slaughter house is made slightly worse by the realization the head is that of a woman and the legs are that of a man.  I leave it to you to determine which, if either, is improved by the addition of the other.

So for now at least, if you want to see what actually exists in the wilderness, with heads and legs attached, you are going to have to get off the couch and work for it.  But like most technologies, I am sure these virtual representations will continue to improve.  In fact it might not be long before virtual me in the wilderness is able to see actual you on your couch.  I’m thinking at that point you are going to want to turn the technology off, leaving me virtually alone.

To see the actual Bing Photosynth of the bridge follow the attached link.  But while there, please remain quiet.  I am clearly resting.

Bridge Shot in Yosemite

NOTE: On 7 February 2017, Microsoft decommissioned the Photosynth website and services.

Also check out:

Virtual Parks

How To Backpack Paleo Style

BaconLet me start by saying that I am neither a caveman nor an expert in paleolithic food consumption.  I have not published a PhD dissertation comparing The China Study with benefits of dino-dining.  I leave dietary science research to the more qualified, or at least the more openly opinionated.  I’m just a simple minded outdoorsman, trying to make my way through the wilderness carrying as many calories in as few grams as possible.

What is the Paleo Diet?

Mixed VegetablesPerhaps oversimplifying, the Paleo Diet consists of foods that were available and consumed during the paleolithic period.  In the unlikely event you’ve forgotten, paleolithic refers to the Stone Age, starting 2.5 million years ago and ending 20,000 years ago.  The Paleo Diet is generally described as the diet of the hunter-gatherer.   In other words, Paleos had to either kill it or find it on the ground.  I am guessing the 3 second rule was longer then, maybe more like 3 weeks.  At any rate, the diet was made up primarily of meat, vegetables, and seasonal fruit.  Products of the future agriculture age, involving food processing and probably government labeling, were not included.   Grains, pastas, and breads are not considered part of the diet.  So in other words, hamburger yes, hamburger helper no.

I have no idea how we know exactly what these homo sapiens did and did not eat.  Perhaps anthropologists have examined cave drawing banner ads, or conducted internet polls.  These experts seem pretty confident that forbidden items include: refined sugar, grain, dairy and legumes.  Some actually say the only vegetables Paleos can eat are ones that do not require cooking. It is okay to cook and eat vegetables not requiring cooking, just not to cook and eat the ones requiring cooking.  My stone age cerebral cortex is throbbing.

As a side note, I have found no reference to cannibalism.  I assume if it occurred during the paleolithic period it would still be okay today, but cannibal helper would be strictly forbidden. Assuming of course I got all this right.

Paleo Backpacking

As I consider them, the similarities between Paleo-sapiens and Backpack-sapiens are indeed eerie.  Both are clearly:

  • mobile wanderers
  • opportunist gatherers
  • occasional hunters
  • fire makers

They are also

  • usually hungry
  • dirty and stinky

Paleo-Packer Compatibility

Many of the traditional backpacking staples are clearly non-Paleo.  The modern Paleo-Packer would have to brutally club to death his desire for oatmeal, ramen, and even the peanuts (legumes) from good old raisins and peanuts (GORP).  Many of the things we consider non-perishable and light weight are disallowed, where as things that are perishable and heavy, such as fresh meat, vegetables, and fruit are just fine.

Sweet PotatoesSurprisingly, almost every Paleo recipe book includes sweet potatoes.  Apparently the paleolithic landscape was simply littered with wild yammers.  I am not sure how wild; for example, were they gathered or actually hunted?  At any rate, they must not have required cooking, but they probably were, since all of today’s recipes call for it.

Another popular modern Paleo dish is called PemmicanPemmican is a supposedly nutritious concoction of fat and protein.  Used as a high energy source by arctic explorers, it can be made from whatever resources are available: beef, bison, deer, elk or moose.  Pemmican is basically 50% dried pulverized meat, combined with 50% clarified (melted) animal fat.  In some cases berries, such as  chokeberries, are added.  Seriously?  How much choking can one energy concoction contain?

Paleo Backpacking Options

As I hunted through various resources, websites and books, I was able to gather a list of traditional or at least common Paleo Backpacking food choices:

  • Pemmican (though it may melt in warm climates)
  • Foil packed tuna
  • Foil packed chicken
  • Jerky (beef, turkey, elk)
  • Summer sausage
  • Salami
  • Sardines
  • Almond butter
  • Dried fruits (apples, apricots, bananas, mangoes, dates, etc)
  • Raw or dehydrated vegetables (sweet potatoes, yams, broccoli, onions, peppers, mushrooms, zucchini, etc)
  • Coconut Oil
  • Almond flour products (muffins, pancakes, whatever)

Unsolicited Advice

Through my research I also gathered there is a non-believing splinter clan whose advice can be summed up as:

Hey caveman, shouldn’t you be spearing and clubbing your way through the wilderness?

The problem here of course is the word advice.  According to the North Carolina Board of Dietetics / Nutrition, offering advice on Paelo diets without a license is illegal.  They have aggressively gone after Steve Cooksey, clubbing him over his Paelo diet blog.  The Institute for Justice has joined the fray, offering their hairy-knuckled support for the Paleo blogger.  They are now representing Steve in a free speech lawsuit against the North Carolina nutrition board (Cooksey v. Futrell).  You just cannot make this stuff up.

It is ironic that a caveman has launched a free speech lawsuit against a modern science board, whose intellectual beef against him appears to be “ugh“.  That of course is merely my opinion, and not advice.  In fact, nothing in this Paleo diet article should be construed to be advice.  Personally, I would advise against anyone offering advice, if doing so were not clearly illegal, at least according to the North Carolina Board of Neanderthals.

I do wish the caveman Steve well in his lawsuit, and hope the North Carolina board ends up consuming a significant portion of humble pie.  Is it okay if I recommend the Paleo sweet potato pie?  Probably not.

How To Treat Water Using Solar Water Disinfection (SODIS) Method

Removing harmful pathogens from questionable water sources is a challenge for any outdoor enthusiast.  The most common methods are boiling, filtering, chemically treating, and exposing to UV light.  When most of us think of UV light, we think of an expensive battery powered device, such as a Steripen™.  The sun, however, is also a pretty good source of UV light, and given enough time to do its thing, can be just as effective as its artificial counterpart.

Solar Water Disinfection, or SODIS, is supported by the World Health Organization, UNICEF, and the Red Cross.  It has become more and more popular in developing nations as a cheap and effective water treatment solution.  The required ingredients for success are fairly simple and readily available:

  • A clear Polyethylene terephthalate (PET) bottle
  • Water
  • Sunlight
  • 6+ Hours

SODIS Water Purification MethodThere are of course a few minor important details.

  • Pet Recycle Code 1The bottle must be clear, unlabeled, unscratched and no larger than 2 Litters.  If the water is deeper than 10-12 inches, the UV light penetrate is decreased, and results less effective.
  • In the US, PET or PETE bottles are usually labeled with recycle code “1”.
  • The water being treated should be relatively clear.  Cloudy or turbid water should be filtered prior to treatment.
  • Bottles should be placed on their side, not upright, to ensure maximum exposure to sunlight.  Placing bottles on reflective surfaces have proven even more effective.
  • The sunlight should be relatively unobstructed.  If clouds cover more than half the sky, the exposure time will need to be increased, typically doubled.
  • This technique works well on common pathogens, which can cause life threatening diarrhea, but it is not effective against poisons or toxins.

Clearly this method was designed with developing nations in mind.

What about outdoor adventurers?

The question of SODIS for backpackers really comes down to practicality.  Although there certainly is plenty of sunlight in the wilderness, adventurers are often on the go, making 6 hours of undisturbed solar exposure a challenge.  Many are already struggling to figure out how to recharge their smartphones with clunky portable solar panels.  The thought of adding rows of water filled PET bottles in to the mix is perhaps just too much to ask.

Also, backpackers may not have the required easy to find in the front-country bottles.  Although some ultraliters, and some ultra-cheapskates, may carry reused ultra-thin Code-1 PET bottles (the Gatorade™ type), most of us have been trained to carry indestructible Code-7 BPA Free bottles (the Nalgene™ type).  Unfortunately Code-7 bottles do not allow the UV light from the sun to work its magic.

Is any of this relevant to backpackers?

Take Water from Top of LakesPerhaps.  When most outdoors enthusiasts think about gathering water, we tend to favor fast moving streams.  The assumption is that the aeration and filtering will produce a purer, healthier water source.  Assumptions, however, are not always correct.  SODIS has proven that extended undisturbed exposure to UV light can disinfect pathogens.  Water in swift flowing streams is far from undisturbed exposure.  Lakes, however, are a different matter.  Is it possible that lake water, relatively still and exposed to repeated daily doses of UV light, is a better source of safe water?

According to Robert W. Derlet, MD, a Sierra Water researcher and author:

The UV rays from sunlight are powerful killers of microorganisms. For this reason, the first twelve inches of surface lake water have the fewest microorganisms. In nearly 300 samples of water from Sierra wilderness areas, our research group consistently found fewer total bacteria in lake surface water when compared to streams. In addition to sunlight, other factors may also reduce bacteria including settling effects, or ingestion of bacteria by zooplankton or other small organisms.

In other words, even if we do not carry PET bottles, and line them up for 6 hours of exposure, we can benefit from the cleansing SODIS-like method of UV light, if we are careful where we gather our water.  It turns out, the tops of lakes are better than the bottoms.

So as you sing your way towards the wilderness water, remember: 

Take it from the TOP!


NOTE:  The SODIS Initiative is part of the Swiss Federal Institute of Aquatic Sciences and Technology.  For more information, consult their website:

https://www.sodis.ch

How To View The International Space Station

International Space Station: Photo Credit NASAA clear night sky in the wilderness offers spectacular views of celestial objects, including the International Space Station (ISS).  After all, the dang thing weighs 954,334.8 pounds and covers an area of 26,909.78 square feet.  I mean you’d have to be practically blind not to see it.

According to the NASA ISS facts and figures page:

The ISS solar array surface area could cover the U.S. Senate Chamber three times over.

Frankly I think they should use some of the extra to cover the House of Representatives.  Both houses could benefit from some heat, but I digress.

When observed from Earth, the ISS is one of the brightest objects in the sky, with an apparent magnitude of -5.9.  It appears as a bright white dot, moving quickly across the night sky.  So why then do so few of us actually see it?

Okay, yes it is 240 miles in the air.  But don’t forget, 240 miles is the same distance Gandhi went for salt.  I have no idea how far he went for pepper, but the point is 240 miles can’t be that far.  The real problem is not the distance up, but rather that the satellite keeps moving.  Not only does it move, but it does so at a rate of 17,500 miles per hour, or 292 miles per minute.  At that speed, when asked to pass the salt, Gandhi could have said give me a minute, and actually meant it.

So how then do we see this really cool moving object?

We just need to know when and where to look.  Circling the earth every 92 minutes, we get quite a few chances.  It is possible, though unlikely, to see it during daylight.  Our best chances are when the sun is reflecting off it brightly and the sky is dark, usually just after dusk or slightly before dawn.  But frankly, we can’t stand out here all night, and we are probably looking in the wrong direction.

Satellite Tracking: Credit NASAOn a two week trip to Yosemite, Scott, a backpacking companion, was carrying a small piece of paper with magical insights:  a list of dates, times, durations, maximum elevations, directions of entry, and directions of exit.  Every night, when the sky and horizon allowed, we gathered and awaited the space stations appearance.  If there had not been prohibitions against erecting structures in the wilderness, we would probably have constructed nightly mini Stonehenges in anticipation.  It was just that cool.

Assuming you don’t have Scott on your wilderness adventures, you are going to have to create your own magical paper.  Luckily, NASA has created a website to help you do just that.

https://spaceflight.nasa.gov/realdata/sightings/

Here you will find factual information about the International Space Station and a wide variety of other observable satellites.  There is even a cool “applet” that will allow you to enter various criteria, including your location on the planet, and with the push of a button create your own list of observation opportunities.

Zvezda_toilet: Credit NASAThe site offers these viewing tips:

For best results, observers should look in the direction and at the elevation shown in the appearing column at the time listed. Because of the speed of the orbiting vehicles, telescopes are not practical. However, a good pair of field binoculars may reveal some detail of the structural shape of the spacecraft.

You may, however, want to limit the power of your binoculars.  After all, as you can see from the picture, some celestial movements are best unseen.

How To Have a Blast as a National Park Service Employee

New employees of any company or organization are faced with digging their way through various policy and procedure handbooks.  Typical tomes requiring shoveling include volumes on workplace health and safety, anti-discrimination policy, sexual harassment, and most recently the dos and don’ts of bullying.  These manuals are typically painful to read and require some sort of mandatory testing to artificially infuse interest.

NPS Handbook CoverOne employee handbook I recently came across, however, sparked my attention like no other.

National Park Service Handbook for the Storage, Transportation, and Use of Explosives

Now I have been fooled by YouTube™ videos where the advertised title and actual content were not in the least bit related.  I carefully kept my giddy expectations in check as I followed this link to the online book:

https://www.nps.gov/history/history/online_books/npsg/explosives/

NOTE:  Updated link: https://www.nps.gov/parkhistory/online_books/npsg/explosives/

It is quite possible that clicking this link blasts an automatic warning message at the Bureau of Tobacco and Firearms.  But even if it does, it also magically summons an eleven chapter, 221 page bible of wilderness pyrotechnics.

Many of us who have spent significant time in granite country have wondered in amazement at the trail excavation and armory work of various switchbacks and trail ledges.  We imagine the blood, sweat and tears exerted from the working end of a Pulaski, Mattock, or McLeod.

Blast HoleIn these areas of obvious labor, we occasionally stumble upon mysterious worm holes, the apparent effects of some giant silicon based life form.  Or is it?  Is it possible that in addition to exerting sweat, a subset of these NPS employees is actually having a blast?!

If the official job titles provided in the handbook are any indication, it seems there is no lack of people wanting at least a part of the action.  With no exaggeration positions include:

  • Park Service Blasting Officer
  • DSC Blasting Officer
  • Blasting Inspectors
  • Regional Blasting Officers
  • Chief Park Blasters
  • NPS Blasters
  • Explosive Handlers
  • Magazine Operator

I assume the latter is operating a device that holds explosive charges, as opposed to the latest issue of Field and Stream.

I confess to being a tad confused as to the target audience.  The same manual that explains the formula for calculating borehole depth when subdrilling:

(H = 2.5 x Ve x (B² + J²)½ + T) / Vr

Also explains:

Allow no one to handle explosives while under the influence of liquor, narcotics or prescription drugs that impair performance.

As a side note, I found no guidelines regarding performing the actual borehole calculations while under the influence.  Go figure.

Blastbore RemnantFor the backpacking layman, these procedures and people have something to do with removing big rocks by drilling holes in them and blasting them into new locations.  Pretty cool.

Most of us have seen remnants of these endeavors, without ever considering the science.  Let’s consider at least a portion of that burden.

In rock blasting, the term burden refers to the rock between the borehole and the open face or edge.  To successfully move it requires knowledge of the interrelations between the depth of the hole, the velocity of the explosive, and the velocity of the rock.

Blast Bench UpBy delaying charges in the boreholes, the total burden can be increased and direction controlled.  For example to move a large burden up off the bench, a series of rows can be timed in sequence.  The borehole row 1 is discharged, removing the burden from it to the face, freeing up the second discharge to take the burden from row 2 to 1, followed by row 3 to 2 and so on.

Edge Bench DiaganolSimilarly, if delaying in diagonal rows, the burden can be moved up and to the right.

So there really is a science to blowing up rocks.  So much so there are multiple levels of certification programs (NPS/65) for people who do this for a living.

All this requires basic physics and applied mathematics.  It occurred to me that if more teenaged boys were allowed to apply math in this explosive way, this next generation would be prepared to easily blow away our countries competition.  With burden removed, we would rock!

How to Survive – Logan Bread

Ambiguous titles are fun.  Is Logan Bread the answer, or simply part of the question?  Or perhaps, both?  I was at a dinner party recently where a woman, after sampling a brownie-like item declared:

Logan BreadThis tastes healthy.

There was immediate recognition, by all within ear shot, exactly what was meant.  Needless to say this pronouncement did not create a mad rush towards the serving tray.  The feeling was one of reverent respect for the apparent wholesomeness, combined with a surprising decline in actual desire.

To sustain life, backpackers eventually require sustenance.  Classic conflicting forces are usually at play: bulk, weight, calories, nutrition, shelf life, and taste.  How do you create a compact, non-perishable, quality source of tasty calories?  Is it even possible?

According to legend, in the 1950’s this very challenge faced an expedition team set on summiting Mount Logan.  The resulting recipe, Logan Bread, meeting all desired requirements, is now referred to as the pinnacle of do-it-yourself energy bar-dom.  Given its historical predecessor, known as hardtack or sea biscuits, one could claim the competition was not particularly stiff.  Others counter, however, it was in fact the stiffest thing imaginable – 6 parts flour, 1 part water, and 2 parts broken teeth.

Bread RationIf the Logan Story indeed cracked our long toothed desire for outdoor substance, it must be an amazing tale, climaxing in an amazing recipe – one in which we can confidently entrust our backpacking lives.  Recipes are full of details, and details are important.  It can mean the difference between the rise and fall of our daily bread.  As I delved further into this expeditionary tale, I found nagging conflicting details.  The shear variety of recipes claiming the title Logan Bread, calls somewhat into question their validity.  How can there be so many different recipes claiming this one momentous 1950 event?

Most claim the event was an expedition to the top of 19,550 foot high Mount Logan, Canada, the second highest peak in the Northern Hemisphere .  Impressive.  Others, however, refer to Mount Logan, Alaska.  To many of us uneducated, there is probably not much difference between Canada and Alaska.  There is in fact a Mount Logan Alaska, however, it stands a mere 6,204 feet high, making it the 17,576th highest peak in the US.  This hardly rises to a level worthy of legend.

If details are important, how can we intrust our detailed recipe for life to someone who cannot tell the difference between 6,204 feet and 19,550 feet?  That percentage of error is over 68%.  If we calculate the error based on difference between peak rankings of 2 and 17576, the percentage error approaches 100%!  So exactly how much wheat flour are we really suppose to add?!

To make matters worse, you can find a Mount Logan in Arizona, Colorado, Montana, Ohio, Washington and Wyoming.  Perhaps this explains the plethora of recipes purporting to be Loganesque.

There does appear to be some common ingredients.  Almost all  Logan Bread recipes contain some combination of the following:

  • WLogan Bread Ingredientsater
  • Wheat Flour
  • Brown Sugar
  • Powdered Milk
  • Honey
  • Molasses
  • Oil
  • Salt
  • Baking Powder

As fibrous filler, they recommend a variety additions including:

  • Dried Fruit
  • Oats
  • Nuts
  • Seeds

To spice it up, many include

  • Cinnamon
  • Nutmeg

One major area of divergence seems to hatch from eggs.  Some included them, many do not.  The argument against eggs seems to be one of shelf life and sickness.  Backpackers appear to have an irrational fear of eggs and salmonella, which if I am not mistaken is caused by salmon eggs, which is why I prefer to use a spinning lure.

More concerning to me is the complete lack of chocolate chips.  Seriously, are we expected to believe life is worth living without chocolate?  For my Logan Bread, I have added a healthy dosage of dark chocolate chips.  Luckily, chocolate contains antioxidants, so a healthy dose can be a lot.  I base this improved recipe on an expedition to my own backyard compost heap, which I coincidentally call Mount Logan.  To me, without the chocolate, standard Logan Bread tastes a tad too much like the smell of my own Mount Logan.

Check out this recipe at:

https://howtowilderness.com/food/logan-bread

Or other recipes at:

https://howtowilderness.com/food/backpacking-recipes/

How To Survive the 5 Stages of Laundry

As with most griefs, there are five stages of wilderness laundry:

  1. Denial:  I don’t smell anything.  Why are you sitting way over there?
  2. Anger: Seriously, it is not that bad!  Besides, you don’t exactly smell pine scented!
  3. Bargaining: Listen, I’ll take a quick dip in the lake when we get to camp, OK?
  4. Depression: You really do think I smell bad.
  5. Acceptance: Ok, Ok.  So what do you want me to do about it?

Don’t sweat it

Wilderness LaundryIt appears that by itself sweat does not smell, at least not mine.  However, micro organisms which interact with sweat, like an unwanted occupy movement, can create quite a stink. Wilderness cleaning strategies are as varied as the bacteria bathing most backpackers.  To tackle this load I think in terms of three laundry baskets: delicate, permanent press, and regular

Delicate

Delicate is the least interventionist laundry solution.  In fact, you can think of it as mostly prevention and wishful thinking.  The theory is pretty straight forward.  Wilderness smells come from bacteria grown in sweat.  Decrease lingering sweat and you decrease lingering smells. Since sweating is a natural process to regulate temperature, we need to do everything we can to control temperature first.  Proponents wear clothing in layers and quickly remove them as they heat up.  Better to be too cool than to accidentally sweat.  Antiperspirants can be deployed in all the normal places, and some of the abnormal ones as well.  Wicking clothes can accelerate the evaporation of sweat.  Removing boots and letting socks dry out during hiking breaks may also help.

Most multiday backpackers who use this delicate laundry approach, are referred to as “stinky”.  To mask reality you may be tempted to apply deodorant.  Frankly, covering your body with a bouquet of sweet scents may not be the best approach when traveling in bear country, unless you desire a hug.  In that case, I recommend honey scented or perhaps maple sausage.

Permanent Press

Permanent press is the next level of intervention.  It involves an acknowledgement that sweat prevention probably did not work, and we need a way to press this bacteria causing solution out of our clothes on a continuous, one could say permanent, basis.  Wash and WearDue to environmental concerns, proponents of this free press are agitated by the thought of soap, even biodegradable.  They prefer a proactive yet minimalist approach.  The most common solution to remove bacteria is to thin it in water and then squeeze it out.  This could be accomplished by removing clothes and rinsing in the river, beating clothes against a rock, or simply jumping in with clothes on in an organic strategy known as “wash and wear”.

Regular

For the regular folks, who believe soap can be used responsibly in the wilderness, a more aggressive approach is taken. The challenge is that normal amenities like a laundry sink or tub are noticeably lacking, and using soap in a river or lake is completely out of the question.  Creative approaches are therefore required.  I have seen or heard tell of various containers in which to soak soapy clothes:

  • Plastic ziplock bag
  • Emptied bear canister
  • Cooking pot
  • Wide mouth Nalgene bottle

To achieve warm water for cleaning some carry black plastic jugs or containers which convert the suns ray to heat.  In any case, the rinsing of soapy water should be thorough and at least 200 feet from the water source.  Needles to say extra precaution should be taken to clean any improvised laundry containers you plan to eat or drink out of later.

Solar Sterilization

Regardless of the cleaning approach, a simple clothes line and the sun are typically used for drying.  If you do not dry your clothes quickly and thoroughly, you risk growing mold which frankly pretty much defeats the purpose of washing to begin with.

Solar CleansingThere is a growing scientific debate, however, regarding the effectiveness of using the sun not only to dry clothes, but to actually clean and sterilize them.  It starts with anecdotal memories of Grandma’s lovely laundry, where stained diapers hung on the line were magically sun bleached.  Not only were smells removed, but the actual stains vanish!  Backpackers have ample access to the sun, and the thought of removing smells and stains by simply offering them up to the sun god is, well frankly, too good to be true.

The scientific debate usually goes something like this:

  • Sun light contains UV light, which is really powerful stuff causing sun burns and in extreme cases, skin cancer.
  • UV light has been used for years in water and sewage treatment.  Surely my backpacking laundry is no worse than urban sewage!
  • UV light is proven to disrupt DNA.  Organisms with single celled membranes such as bacteria and fungi found in clothes are particularly vulnerable to UV disruption, rendering them unable to reproduce or sustain life.  Stinks for them.
  • Grandma’s laundry line is actually a slow cooking UV sterilizer.
  • Problem solved!

Soiling the party, however, are observations such as:

  • If the sun can really sterilize my backpacking clothes, then why are my sun baked shirts stinking to begin with?
  • UV works best with direct hits.  Even small particles in liquid can shadow pathogens, allowing them to survive.  One can only image what shadowy things lurk in a backpackers pants.
  • The UV spectrum used in water treatment plants operates at 2537 angstroms, or 254 nanometers.  This spectrum, though present in sunlight, is usually absorbed by our atmosphere. It’s presence on earth therefore is extremely rare.  For practical sterilization purposes, it has to be artificially created with UV lamps.

Damn you science!  Stop teasing me!

But don’t give up quite yet.  The promise of simple sunlight cleaning and sterilization is just too good to give up on.  I came across an ACS Publication of Applied Materials and Interfaces article titled: 

Realizing Visible-Light-Induced Self-Cleaning Property of Cotton through Coating N-TiO2 Film and Loading AgI Particles.

It seems two Chinese scholars, Deyong Wu and Mingce Long, are plotting to turn the entire Chinese laundry business on its head.  Others, including researches in Australia and US are also exploring coatings of Titanium Dioxide Nanoparticles for self-cleaning anti-bacterial clothing.  If successful, the five stages of laundry could be condensed in to one solar blast.

Oh sure, there still needs to be research.  I am personally skeptical we will be able to harness the moon any time soon for required ironing and folding.  Perhaps we should also be a smudge nervous that manufactures are adding chemicals to our pants that enable basic sunlight to vaporize dirt.

After all, applied to a hat, who knows what would become of my dirty mind.


How To Forage the Forest

Those of us of a certain age remember Euell Gibbons, a man of seemingly normal human intelligence, declaring on network television:

“Ever eat a pine tree?  Many parts are edible.”

Pine Tree with Food BowlWhat an idiot!  Not Euell, me.  Years I wandered through thick pine forest, lugging my rolled oats and dirt flavored granola bars, never once realizing I could simply eat the trees.  This fruit of knowledge, however, raised new concerns for me, such as:

Which goes better with fresh trout, red fir or white fir?

Still something in the back of my mind was just not right.  The same could also be said for most of the front.  If our forests are enormous arbor buffets, minus the sequoia sized sneeze guards, surely they would be filled with herds of grazing obese Americans.  In my wilderness wandering, most white trash trail-ers I encountered were small, scrawny, and seemingly starving.

If I remember correctly my Latin roots, forage comes from the words fore, meaning in front of you, and age meaning unavoidable death.  For the Greeks, forage derives from the word forge, meaning to make falseForage therefore loosely translates to:

before you lies certain death because this is all totally false.”  Loosely.

manzanita berriesThere are two reasons to forage in the forest, neither of which is particularly appealing:  revival or survivalRevival is an increased spiritual interest in something.  It is true we have become disconnected from our natural food chain by, well, our grocery food chains.  Food magically appears hermetically sealed in plastic, completely removed from its source, usually by underpaid migrant workers.  Reconnecting to our wild food roots, regardless of how bitter they taste, is the dream of the forage revivalist.  For the survivalist, well I guess we just got ourselves into such deep doo-doo that we need to eat a few logs to get out.

There must be food in the wilderness.  After all, birds and squirrels are eating something.  Some of it sounds surprisingly similar to their plastic wrapped relatives:  wild strawberries, blackberries, asparagusonions, and miner’s lettuce.  Some things seem totally lacking. I have never found miner’s croutons or miner’s lettuce dressing.  Also, some of it seems down right weedy: dandelions, cattails, and oh come on, seriously, nettles!?

The forest foraging marketing department could use some serious revamping.  I have reviewed a wide variety of foraging books, guides, and websites, and offer up some of these apparent pearls of wisdom:

  • Braken fern tips, when tightly curled are delicious.  As they begin to uncurl they become bitter and poisonous.  Recent studies have also linked consumption to esophageal cancer.
  • Wild asparagus is delicious steamed or boiled, unless leaves have formed, in which case it become toxic.  Eaten raw, it causes nausea and diarrhea.
  • Nettles should be cooked to remove the stinging hairs.  If undercooked, even slightly, they can cause miserable tissues swelling in your mouth and throat.

Warning Sign - Poison OakFrankly, it is difficult to image that Mother Nature has not been sued, let alone the authors of these foraging guides and books.  One author strongly recommended that new foragers maintain a yearly journal.  Based on the labyrinth of risks to life and limb, I declare optimism has never been so bold.

One piece of supposedly helpful advice:

Eat only what the bears will eat. 

First, why are we close enough to their dinner table to see what they are eating? Second, if they really want it, I am pretty sure they are going to get it.

Perhaps this advice simply means we should behave like a bear, focusing on things easily recognizable and digestible such as berries and fish.  I have to point out that bears also eat grubs, and frankly if your hiking partner Steve get’s between bear and cub, he is pretty much in play as well.  I suppose we can indeed take lessons from the bear.  Given a strong enough driving hunger and the element of surprise, we might be able to take out Steve ourselves.

Foraging appears to be growing in popularity, though I am not sure how successful these scroungers actually are.  A suspiciously significant amount of coverage is given to creating brews and teas from pine needles and manzanita berries.  I am not sure too many people are actually starving in the wilderness from a lack of boiled twigs.

Black OakPlants with seeming potential, such as oaks which sustained centuries of Indian tribes, begin to generate reservations when you realize their acorns have to be harvested, sorted, dried, stored, mashed, leached, boiled, shaped into a patty, and only then cooked on a rock.  My instant oatmeal pack is looking pretty good about now.

Maybe the skills required are so refined, that commercial providers are better suited for foraging.  There is a restaurant in California called Forage in the Forest that serves, get this, hamburgers. Call me cynical, but it seems this hunger game has crossed over from gathering to hunting.  If hungry enough, I suppose poached food will have to do.

We now return to Euell Gibbon’s pine nuts.  I have to confess that by now I am no longer sure if this refers to edible seeds, or simply the people like him who think pine trees are edible.

I am slightly embarrassed to say I experienced perverse pleasure when I first heard Euell Gibbons died of malnutrition.  I am not completely convinced this is true, so I personally refuse to Google it for fear of spoiling the immense irony.  I suppose it is possible old Euell simply passed away in his sleep, bludgeoned to death by troop of starving backpackers.

How To Take Decent Wilderness Photos

Leave No Trace principles limit our wilderness take home pay to memories and photographs.  Since memories quickly fade with age, we should probably give these photograph things a snap more exposure.  Professional photographers aside, most of us set our artistic dial on decentDecent seems to be the minimum level necessary to achieve a Facebook like.

CamerasMost casual wilderness photographers are more concerned about camera weight and battery life than the light gathering capabilities of a 300 millimeter lens.   After all, cameras are lower on the survivalist’s hierarchy of needs than say food and water.  We certainly want our memory maker to perform in the wilderness, but if it approaches the size and weight of a lunch box, we may be tempted to simply open it up and eat all 32 mega bytes.

Assuming a small camera with some easy to use features, what can we focus on to improve our decent-cy?

Before we zoom in on that, we should explore the difference between impact and intentImpact is what the observer thinks and feels examining our photograph.  Intent is what we actually meant to convey.  Not surprisingly, these can be in conflict.  For example, a dark shadow can create a partially obstructed view filled with ominous feelings of voyeurism.  Or it can simply mean our fat finger got in the way and ruined the shot.

Understanding how the camera can be manipulated to create various emotional effects can increase the odds that impact and intent, if not married, are at least dating,

Rule of Thirds

Photo with Grid of ThirdsThe first place to start is the frame.  Regardless of any camera settings, if what we are pointing at is not particularly interesting or pleasing, the final picture probably won’t be either.  Some argue that with today’s high mega pixel density, we can shoot wide and improve by cropping later.  But let’s be honest.  We are probably going to post this straight to Facebook, so let’s just act like we give a crop.

The little autofocus cross-hairs in most cameras encourage us to point directly at our subject.  After all, if we are taking a frantic shot of an approaching black bear, we want it to be in focus, and we want it to be in the frame.  Unfortunately, humans do not find dead center particularly pleasing.  Research, probably involving cruelty to animals, eventually revealed the rule of thirds.  If we divide a picture frame into horizontal and vertical thirds, main subjects along the lines and at the intersections are more aesthetically pleasing.  For example, a face looking left appears pleasing positioned on the right third.  A face looking right appears pleasing positioned on the left third.  To highlight an impressive foreground, we place the horizon on the top third.  If we want to irritate the observer subconscious, we place the horizon dead center, or even worse, tilt it slightly.

Dive With ThirdsIn this action landscape, the water is positioned on the lower third line.  My cliff-diving son is pleasingly positioned in the upper left sweet spot.  If we compare impact and intent, we may find in this case that the impact is, well, frankly just impact.  And pretty darn painful impact if I remember right.

Beware of the Digital Zoom

A convenient way to crop a picture is to use the zoom.  Some cameras have an optical zoom, some a digital  zoom, and some have both.  Both zooms make the target seem closer, but they do so in very different ways.  Where possible, turn off the digital  zoom.  It is not increasing the amount of data you have to render a quality picture, it is simply blowing up the pixels that are already there.  Anything you can do with a digital zoom can be done better in software later.

Lighting

Photography literally means writing with light.  The more dramatic the light, the more dramatic the write.  Mornings and evenings, with impressive long shadows, are a great times for pictures.  Where practical, we should inform our wildlife friends that we prefer they perform during these magic hours. Regardless of the actual performance time, as we compose our decent pictures we should be conscious of the primary lighting source.  Is it side lit, top lit, back lit, or front lit?  Each creates a very different feel.  Front lighting is the safest, albeit most boring form.  Our flash can be used even in daylight to provide fill, but given the proximity to the lens, beware of the dreaded red eye.  Unless of course the devil monster look was indeed our intent.

Focus

Nothing changes a picture from decent to indecent more quickly than lack of focus.  Well, actually there may be some things, but we are certainly not going to uncover them here.  Most point-and-click cameras offer autofocus.  In the uncontrollable wild, where nature appears and disappears in an instance, autofocus may mean the difference between Bigfoot and Bigblur.  When less urgency is required, we can have both focus and pleasing cropping by pointing at our main subject, pressing half way down for auto-focus, and then re-framing the picture before pressing the rest of the way.

The Light Benders

It’s fairly obvious that all cameras require light to create an exposure.   The amount  is influenced by three inter-dependencies:

  • the size of the hole – aperture
  • the duration of the exposure – shutter speed
  • the sensitivity of the sensor – ISO speed

These light causes create a variety of photo effects, which are either blessings or curses, depending on our intent.  Almost all point-and-click cameras offer ways to influence these settings, though it may not always be obvious how.

Aperture

Large Depth of FocusAperture is simply the size of the opening which allows in light.  The primary effect from aperture is depth of focus.  The larger the opening, the smaller the depth of focus.

A tiny aperture can create a landscape picture where the plants in the foreground and the mountain peaks in the background are both in sharp focus.  This picture calls attention to everything and nothing at the same time.

Lizard with blurred backgroundA large aperture create a narrow depth of focus.  In this photo, a large aperture creates a image where the blue tongue lizard is in sharp focus, but everything in the background is blurred out.  Dramatic attention is drawn to the objects in focus.

Shutter Speed

Risk Balance

Shutter speed determines how long the picture is exposed to light.  A fast shutter speed will freeze the action in flight.  It is great for limiting blur for fast moving subjects or shaking hand held cameras.

Falls Slow ShutterA slow shutter speed will allows us to take photos in lower light, and create a blur effect which enhances the illusion of movement in a still picture.  For extremely slow speeds, a tripod may be necessary so that only the moving objects are blurred.

Film Speed

Film speed (ISO speed) determines the sensitivity of the light gathering process.  In most cases there is a trade off between speed and image graininess.  The lower the speed, the finer the grain.  The higher the speed, the larger the grain.

Inter-dependency

There are inter-dependencies between all of these settings.  A choice in one will impact the others.  For example, for a low light landscape demanding great depth of focus, we set a very small aperture.  To make up for the decreased amount of light coming through this tiny aperture, we either need to set the shutter speed lower (increasing motion blurs) or the film sensitivity higher (increasing graininess).  Similarly, if we want to freeze a water fall we set a high shutter speed.  To make up for the limited time for light exposure, we have to increase the aperture (decreasing the depth of focus) or increase the film speed (increasing graininess).

There has to be an easier way!

PresetsBecause these controls are so fundamental to photography, most point-and-click cameras offers them, but in a much more friendly mode, such as presets.  Presets are control settings which offer sweet spot combinations, organized by their most common situation.  Since the digital camera can deal with the inter-dependencies, we just need to set the priority, and the other settings will be handled automatically. Although not standardized, there are some common icon images to identify each.  Here are some examples:

  • Action Mode (a running man?):  Forces shutter speed to fast to create a blur free picture.    Results:  Image frozen in time.  Helpful for hand held shots
  • Landscape Mode (a mountain range?):  Forces aperture to small to create a large depth of focus.  Results:  Foreground and background in focus.  In low light, this may require a tripod if shutter speed is too slow.
  • Portrait Mode (a person profile?):  Forces aperture to large to create narrow depth of focus. Results: Target sharp but background blurry.
  • Night Mode (a star?):  Forces shutter speed to slow to increase light and fill flash turned on.  Results foreground well light, background darker but in focus.

Given that preset do not really know what we are photographing, we can trick them into other uses.  For example, portrait mode will likely result in a picture with the background blurred.  If we want a portrait with the background in focus, we can use the landscape mode.  Do not fear, it will not make our subject look like a mountain.  Unless, of course, they already do.

The Photo Finish

Unlike the days of development fees and limited film stock, digital pictures are cheap and instant.  If we don’t like the landscape picture we just took, we delete it and take another.  We can try the same framing with each of the available presets.   We can vary the framing.  Taking a wide variety of pictures not only lets us throw a handful of darts at our target, it also lets us draw the target after we have thrown the darts.

Just because it is easy to capture a massive quantity of varied images does not mean they represent quality.  We should find in our virtual pile the very few decent ones, the ones we really like and post those.  With any luck, others will Facebook like them too.

How To Camp with Glamour

Wilderness adventure brings to mind two conflicting persona’s – the rugged outdoor survivalist matching wits with Mother Nature, and his cousin the Nature Channel HDTV voyeur.  Each labors for his love.  The former hacks free his boulder trapped arm with a penknife, while the latter pries free his remote control trapped under the cushion.

Glamor Tent CabinIs it possible, or even desirable, to bring these two nature fans together on the same adventure?  Can the safety and comfort of the couch be transported into the boulder fields of the wild?  According to the proponents of glamour camping… the answer is right there in your wallet.

Inside Tent Cabin“Glamping” combines glamour and camping, creating a travel adventure which enables participants to be as close to their nature as they are to their nurture.  You can be Sir Edmund Hillary by day, and Conrad Hilton by night.  Imagine sleeping in a canvas tent on the plains of Africa, just a few feet away from a pack of howling hyenas.  Now imagine the tent has an attached bathroom, shower, and running hot water.  Imagine the bed is not a stiff foldout cot, but rather a memory foam mattress, with toasty hot water bottles to keep you snug and comfy all night.  You are starting to get the picture.

Wilderness Banquet TableFor some this glamour camping creates a bizarre juxtaposition, like two nature lovers staring at each other from opposite ends of civilization.  Vendors have paired up to meet this odd couple of demand.  It’s a market where Abercrombie meets Kent, and Lindblad meets National Geographic. The service offering is primal luxury.  The stark and rugged gum tree plains are decked out with banquet tables, as if daring nature to crash the party’s aristocracy.

For some,  the excitement of the wilderness is water down slightly by the pampering.  Like that all too new pair of boots at the cattle dude ranch, these adventures can seem real and yet unreal at the same time.  Authenticity requires a little more dung on the heels, but frankly, you might be surprised at how well you can giddy up without it.  The glamor camping magicians make incredible wildernesses accessible to the inaccessible.   Our family adventures have provided shared remote wilderness memories for groups ranging in age from 5 to 80.

Given the growing surge of glamping dedicated websites, facebook pages, and even pintrest boards, this trend appears to be one with legs.  And these legs seem more than willing to carry the rest of us into the wilderness on a litter, for the right price of course.  Gratuity not included.

How To Backpack with Small Children

Young BackpackerBackpacking with small children is mental, and I mean that in every possible sense.  To do so requires Olympic class mental gymnastics and probably some mandatory drug testing.  Consider for a moment oil and vinegar.  At first they don’t seem to go well together, but if you shake them really really hard it can be absolutely fantastic. Well its the same way with backpacking and children, minus the really hard shaking.  My lawyer and therapist recommended I add that last part.

Approached in the right way, backpacking with children can indeed be fantastic.  Seeing the outdoor world through their curious eyes can open ours in ways we never knew possible.  Assuming you are mental enough, as I was, to take these wild ones into the wild, here are some things you may want to consider.

Did I mention it is mental?

Age and physical strength are not the most important factors in determining if someone is “ready” for backpacking.  It’s mental.  With the right mindset, children can do amazing things.  A properly motivated tiny tyke can pound out mile after mile, and smile after smile.  However with the wrong attitude even a 5’10”, 160 pound teenage boy is a nothing more than a whining baby about his twisted shoulder straps, chaffing hip belt, and missing wireless game controller.

Physical conditioning can enhance safety and improve your overall enjoyment.  Limiting backpack weight to no more than 25-30% of body weight is a pretty good guideline for children.  However before you care for any of those, first evaluate mental state, both theirs and yours.

How to carry on when children are carrying on?

Most parents of small children are well aware their bones can liquefy.  We have all seen it. A child expresses desire at the local grocery store.  You explain calmly and rationally why it is not appropriate at this particular time and zap, the bones are liquid.  Suddenly you are Steve McQueen in 1958, trying to act cool before the amoeba-like blob at your feet. Clean up on isle six is not going to cut it.  Minus a hand held fire extinguisher, you are at a total lose as to what to do next.  Now imagine a similar scene playing out three miles down a mountain trail.  The good news is the grandmother death-gripping a shopping cart walker, mumbling something about your parenting skills, is far far away.  The bad news however is so is your car.

Surely it is more than coincidence that patience and patients sound so similar.  Dehydration is probably the most common wilderness cause of emotional melt down.  One solution is a good swift punch,  preferably Gatorade fruit flavored.  If not, water is a viable option.  One personal piece of advice is to avoid water purification techniques which render water “disgusting” to children.  Filtering or boiling water does not leave an after taste, and kids might actually drink it.  Treating with Halogen leaves water tasting eerily like a community swimming pool.  If you do flavor water, make sure the purification process is complete before you add the Crystal Lite or other additive.

Prevention

Backpackers are often obsessed with ounces of weight.  Backpackers with small children should obsess over ounces of prevention.  Prevention is key to avoiding mental breakdowns, whether yours or your kids.  The ability to anticipate problems and head them off at the wilderness pass is a worthy skill.  Here are some approaches to consider:

Happy Meal Approach

Young BackpackersHappy meals are fun because they are small, well packaged, and contain a prize.  When selecting wilderness outings for children, make sure to include all three.  Avoid super sizing. Don’t bite off more miles than your kids can shoe. Make sure the trek is easy enough for their little legs, or your larger tired ones when you need to carry them. Position the trip as an adventure.  Walking under burden of load, though perhaps a personal joy for you, is understandably torture for a child.  Know your child’s interest and find ways to trick them into walking.  Identifying lizards, chasing frogs, or hunting geocache treasures are all legitimate reasons for kids to move.  Backpacking is not.   When one motion motivation wears out,  come up with another quickly.  Try not to lose momentum.   Also make sure the destination is a prize in its own right.  A swimming hole, frog pond, or waterfall are potential worthy destinations.  If your child cannot tell the difference between the final destination and where you were 30 minutes earlier, you have failed.

Bendable Buddies

Be flexible.  Sure you probably had it all planned out, and yes it is frustrating when it does not go as planned.  But frankly, kids don’t measure conformance to plan as an indication of pleasure, and neither should you.

Gaming their Systems

Entertainment can be an effective distraction.  When little mouths are engaged in rhyming games, I spy games, or silly singing, they are not available for I’m tired, when are we gonna get there, and you said this would be fun!  Think of games as potential solutions to these boredom problems:

  • Driving to and from the trailhead
  • Actually hiking on the trail
  • Staring at each other in camp

However, do not assume what is entertaining to you is entertaining to your child.  Do not mistakenly believe you can create a passion for wild flower identification just because the television is too far away to see.  Take something you know they will like and let them push it a little further.  Water, fire and throwing things all offer great potential.  For example, don’t explain why you can’t throw rocks here. Find a different place you can throw rocks and spend time throwing them together.  Just not at each other.

Conclusion

Our life comes pre-loaded with a  limited number of potential backpacking days and nights.  It is fairly clear that when our founding fathers proclaimed the right to pursue happiness, they were specifically referring to backpacking.  Do not deny yourself or a child the opportunity to maximize this pleasure.  Besides, when you are old and weary, how will you possibly convince your children to carry your backpack if you weren’t willing at some point to carry theirs?

Dismissed.  Carry on!

How To Keep Wilderness Food Sanitary

Food Handler Cert CardIn most of our United States anyone serving food to the public, including a wilderness guide preparing meals in the backcountry, should be Food Handler Certified.  The goal is preventing food borne illnesses.  The industry certification covers standard topics such as causes of food borne illness, factors that contribute to food related diseases, and basic food safety measures to decrease risk.  Like water born bacteria in the wilderness, food bacteria cannot be seen, smelled or tasted.  The appropriate approach is better safe than sorry.

The Partnership for Food Safety Education refers to their food safety strategy as the FightBAC!™ Guidelines.  Get it?  Fight back and fight “bac” – as in bacteria.  The four principles are:

  • Clean
  • Separate
  • Cook
  • Chill

Adventurers who have spent any time in the wilderness will immediately recognize the challenges to these four food safety tenets.

Clean –Wash Hands and Surfaces Often

Wildernesses contain a far greater abundance of dirt than of clean.  In fact, I am pretty sure my fingernails have never been packed with clean.  For environmental reasons, soap is discouraged in the wilderness.  Even so called bio-degradable camp soaps can have a negative impact.  It is possible to create a sanitizing solution with 1 teaspoon of bleach to 1 gallon of water, but wilderness disposal may be an issue.  So what’s an ethical packer to do?  Two effective sanitation techniques are ethyl alcohol (such as Purrell®) for hands, and boiling water for food surfaces (including pots, pans, and cutting utensils).  It may be possible to clean hands with boiling water, but it probably involves the extra resources of a first aid kit.  One thing you may have to get used to is the idea that clean and sterile are not the same thing.  It is possible to sterilize some pretty dirty surfaces, including you hands.

Separate – Don’t Cross-Contaminate

Raw FishThe push for separate but equal food is designed to prevent raw meat contaminates from migrating to other foods and surfaces. Cross contaminated foods such as produce, which are not cook, will significantly increase food illness risk.  Fortunately most backpackers do not bring raw meat on outings, and dehydrated foods are far less likely to cross-contaminate. Even so, you should clean surfaces and utensils when switching between the types of food being prepared.  If you catch fresh fish, it should be treated careful, and cooked and consumed quickly before bacteria can develop.

Cook – To Proper Safe Temperatures

When it comes to food bacteria, the smart approach is retardation.  In other words, we want to keep food in a state that retards bacterial growth.  Oxygen, temperature and moisture are key factors.  Dehydrating food retards growth, and allows us much more flexibility in wilderness storage temperature.  Once food is re-hydrated, however, we need other means to increase safety.  Two ways to keep food out of the danger zone are cooking and chilling.

Most meats are safe if cooked to an internal temperature of 145 F. degrees.  Ground meats and poultry should be cooked to 160-165 F. degrees.  For some backpacking food, the pre-trip cooking, dehydrating and storage are probably bigger risk factors than the wilderness “re-heat” temperatures.   However, better safe than sorry, so reheat foods to the appropriate and safe temperature.

Chill – Refrigerate Promptly

Unless you are snow camping, refrigeration is probably not an option.  This means foods which normally require refrigeration may not be appropriate for backpacking.  Some items, like air sealed hard cheeses for example, are probably safe for a few days.  Dehydrated foods are safer (and lighter to carry) than foods with moisture.

Leftovers, although useable at home, can be dangerous in the wilderness.  Once re-hydrated, many foods become unwanted growth opportunities.  Fortunately, most backpackers are hungry enough to consume the food they have carried.  This is especially true when reminded that if they do not finish it, depending on local regulations, they may have to bury it or carry it – neither of which is particularly fun.

Conclusion

Being in the wilderness makes sanitation challenging.  Being far from the civilized comforts or your own personal bathroom makes the consequence of poor sanitation even more challenging.  Do yourself and everyone else on the trip a favor – remember to clean, separate, cook and chill.  In fact, chilling in the wilderness is the primary reason I backpack.

For more information on food safety, check out:

https://www.foodsafety.gov/

How To Acquire a Wilderness Permit

Permits? We don’t need no stinking permits!  Or do we?

Land Owner LogosBackpackers love to travel in spectacular remote wildernesses.  These highly desirable lands however are not controlled by a single entity. Understanding the mountainous range of permit requirements can feel as wild as the wilderness you want to backpack.  As an example, your target land may be private, a State Park, a National Forest, a National Park, a designated Wilderness, or controlled by the Bureau of Land Management.  To make matters worse, even where wilderness areas are controlled by the same land agency you may find completely different rules and regulations.

Navigating your pre-trip permit adventure without the equivalent of a trail map and compass can leave you lost and confused.  To assist in your journey for a journey, I offer from my own experience a list of questions to ask the land manager.  The variety of responses may surprise you.  After each question I share various answers I have received, not to confuse or discourage you, but rather to motivate you to seek the clarity necessary to avoid the high altitude headache of wilderness permit sickness.

Is a wilderness permit required?

Perhaps surprising, the answer is not always yes.  Parts of some National Forest lands do not require camping permits at all.  The most popular areas usually do, but not always for the same seasons or activities.  Some areas, such as the Emigrant Wilderness, only require permits for overnight trips in the back country.  Others, such as the Desolation Wilderness, require permits for any activity including day hikes.  Some require permits all year round, while others only during certain peak seasons.    Other areas may require additional permits for specific activities, such as climbing the cables to Half Dome in Yosemite National Park.

How do I acquire a permit?

Sample PermitThe adage “ask and you shall receive” is true in many but not all wilderness areas.  Some, such as Carson-Iceberg Wilderness, do not have a quota.  The demand is typically well within the “capacity” of the wilderness, and you can simply ask for and receive a permit on the day of your outing.  Others, such as Joshua Tree National Park offer self-registration walk up kiosks, making the task particularly simple.  In high demand areas such as Mount Whitney you will find strict quotas controlling the number of people per day per trailhead.  Yosemite National Park uses an advanced registration lottery system, with hopeful backpackers requesting dates and alternatives as far as 6 months in advance.  Some land agencies hold back a certain number of “walk on” permits to be issued each day, but you are not guaranteed to receive one.  You can literally find yourself all dressed up with no place to go.  Some land managers require you to appear in person to pick up your permit, while others will send the permit to you in advance or place it in a drop box where you can pick it up outside of normal business hours.  Rummaging with a flashlight through a ranger station drop box at 4 am, hoping to find your name, adds an element of excitement to any adventure.

Are there wilderness permit fees?

The simple answer is some charge and some don’t.  The Carson-Iceberg Wilderness has no permit fees for individuals and family’s, while the Desolation Wilderness require fees for everyone.  Most require fees for commercial use. If you are going to make money off the land owner they will want their fair share, typically in the 3-5% of revenue range.   The King Range National Conservation Area requires fees for every organizations, even non-profits such as the Boy Scouts.  If fees are charged they may be on a per trip basis or on a per person per day basis.

Are there any other fees?

Money CollageAlthough you hate to ask because it might encourage them to think of additional fees, it usually is better to know in advance.  Land managers using third party reservation systems, such as Yosemite National Park, may include registration service charges. National Parks and State Parks often have entrance fees, not covered by your wilderness permit.  Some spots, such as Big Sur Ventana Wilderness, also have parking fees.  Some special use permits such as Yosemite National Park’s Half Dome permits require additional fees.  Even if you have a current state fishing license, you may find some land managers and regional parks charging additional fish stocking fees.

Although you will spend the majority of your wilderness time far from vendors and services, you may need to pull out your wallet several times just to get there.

Are there any location restrictions?

Possessing a wilderness permit does not actually mean you can camp anywhere in the wilderness.  There may be area restrictions, sometimes marked on your map and other times described in the fine print of your permit.  The restriction may describe the only places you can camp, or perhaps the only places you can‘t.  For example in Henry Coe State Park you may only camp in designated campsites.  In other parks you may be able to camp anywhere but certain areas.  For example in the Emigrant Wilderness you can camp close to Buck Lake, but not Emigrant Lake.  In Yosemite National Park you can not camp within 5 miles of the trailhead.  To help disperse backpackers in the Desolation Wilderness your permit requires that you spend the first night within a certain designated “zone”.  In almost all areas, you are required to camp at least 100 feet away from water.

Are there any time limits?

Although some of you may want to live in the wilderness permanently, land managers place time limits on how long you can stay.  This covers your overall trip duration, but may also include limits to specific hot spots.  For example, in the Emigrant Wilderness you can camp at Maxwell Lake for weeks at a time, but only 1 night at popular Bear Lake.  Wandering rangers will check your permit and chase you out if you overstay your welcome.

Are there group size limitations?

Although I have never heard of a height or weight limitation, there are certainly limits to the number of people in a group.  These can also vary greatly.  For example, in the Emigrant Wilderness the limit is 15 people traveling together, yet in the Desolation Wilderness the limit is 12.  In Yosemite National Park if you are traveling “cross-country” you are limited to 8 people, but if you agree to stay “on-trail” at all times, you can have a group of 15.  To prevent people from simply requesting multiple permits to overcome these limits, land managers may require groups that know each other to have different itineraries and never be closer than 2 miles from each other.  There are also limitations to the number of pack animals and pets in a group.

Are there fire permit requirements and restrictions?

In some areas your wilderness permit is also your campfire permit.  In others such as National Forest lands which do not require a wilderness permit, you are still likely required to acquire a campfire permit.   However even if you have a campfire permit, there are often campfire restrictions.  Some areas, such as Desolation Wilderness, require that you only use backpacking fuel stoves.  Others require that you only build fires in existing fire rings.  Many restrict fires in areas with limited natural fuel sources, such has highly impacted popular lakes or when camping above the tree line.  For example in the Emigrant Wilderness you are not allowed to have fires above 9,000 feet or within 1/2 mile of Emigrant Lake.  Some areas, such as Joshua Tree National Park, do not allow you to gather wood for fires, even for use in designated fire rings.  Areas that do allow fires, may require that you carry a shovel.

Are their specific bear protection requirements?

Bear CanistersIn order to protect both humans and animals, backpackers are responsible for keeping food out of their reach.  In some areas, such as the Emigrant Wilderness, backpackers are encouraged to use various bear bag hanging techniques.  In other parks, such as Yosemite National Park, bears have learned to foil such techniques and land managers require the use of approved bear canisters.  This may also be true in areas where there are not trees available for hanging food, such as above 9,000 feet elevation or in locations such as the California Lost Coast.

What about crossing land manager boundaries?

Many adjacent land managers have reciprocal agreements.  For example, a permit for a trip starting in one wilderness may be recognized in another wilderness.  You will be responsible for knowing and following the rules and regulations of each wilderness you enter, but will in all likelihood not require multiple permits.  For example when issued a permit for the John Muir Trail, you may cross through Yosemite National Park, Kings Canyon National Park, and Sequoia National Park.

Conclusion

As you can see from the above examples, what is actually permitted, even if you are wilderness permitted, can vary greatly.  Knowing what questions to ask before hand can help you acquire and actually understand your wilderness permit.

How To Be a Rock Star Gazer

Star Struck

By Vinish K Saini from Chandigarh, India (Moon n Venus played hide-and-seek) [CC-BY-SA-2.0 (https://creativecommons.org/licenses/by-sa/2.0)], via Wikimedia Commons
Moon and Venus (credit: Vinish K. Saini)
You don’t just want to be a star gazer.  Anyone capable of tilting their head back at night can be that.  You want to be a Rock Star Gazer.  A Rock Star Gazer  is a gazer who says:

That red star is Betelgeuse.  It represents the arm pit of the great hunter Orion.

The typical star gazer is more likely to say:

Oh, that pretty one is twinkling, I think it’s… ops, no it’s just an airplane.

The primary requirement to be a Rock Star Gazer is that you appear to know more than your gazing companions.  One strategy of course is to simply hang out with slightly stupid people.  The reason I caveat “slightly” is that if they are actually “totally” stupid they may not be able to appreciate and acknowledge your star stardom, which pretty much defeats the whole purpose.

Assuming your companions have cleared the 70 IQ hurdle, you probably need to actually learn something about star gazing.  If on a hot summer evening you say with confidence:

Castor and Pollux sure look bright tonight…

and one of your gazing companions mumbles something remotely sounding like idiot, it should be clear you have given up your Rock Star Gazer title. Otherwise you would have known Gemini appears in the winter evening sky.  Lamely offering up that you meant  from Australia is not enough to recover.

Our goal here is not to teach you everything you need to know about stars, but rather to give you a framework to accelerate your journey.  Remember you don’t have to actually get there, you just have to be ahead of the others.

Star Gazing Applications and Tools

Yes, I am aware there are star gazing applications which allow star wannabes to point their PDA towards the sky and declare: “There is Cassiopeia!”  The problem is that pointing the PDA and reading is a dead give away.  It is clear you have no idea what you are looking at other than what you are reading, which the woman gazing over your shoulder can do faster and frankly with better retention.  Use these applications to practice your star gazing skills, but never let others see you.  It’s too much like the Wizard of Oz begging us to “ignore that man behind the curtain.”  Too late, star status lost.

There are some other freely available study resources that can help rock your star world.  Sky charts can be found and printed at http://skymaps.com/  The charts show the current month view of sky, including location of visible planets.  Again, great resource, but study at home.

Rock Star Basics

Establish some street cred by working these facts into the conversation.  At times it may feel awkward and forced, but more than likely they will be mumbling “Wow, I never realized that.”

A star is a burning ball of flames so far away it appears to us as a point.  As such, it has no real shape and is subject to atmospheric interference, causing it to “twinkle.”  Magnifying with binoculars may reveal additional stars, but does nothing to provide more details for the ones we can see.  The color of the star revels its relative temperature.  Hot to Cold, Blue->White->Yellow->Orange->Red.

A constellation is a region of the sky as viewed from earth.  There are 88 modern constellations. Any star within the region is considered part of the constellation.  It does not matter if the star plays a role in some bizarre connect-the-dot version of a flying horsey or a mythical dragon.  If it is in the region, it is in the constellation.

An asterism is a subset of stars that make a well known shape.  The Big Dipper is an asterism, not a constellation.  The constellation Big Dipper is in is Ursa Major (Big Bear).

A planet is a sphere circling the sun.  Those visible to our naked eye are close enough to have a shape, which is a small disk or sliver of a disk depending on the phase.  As such, they do not really “twinkle” like the “pointy” stars.  The color of a planet does not reveal its temperature, but rather the color of its surface or atmosphere.

Remembering stars and constellations is a challenge because most of us don’t do it often enough, and the dang things keep moving.  Or at least they appear too.  To help with navigation, we will divide the sky into 3 regions:

  • circumpolar north
  • zodiac belt
  • southern sky

Finding North

Star_Trail_above_Beccles_-_geograph.org.uk_-_1855505
Star Rotation

Your first opportunity to present as a rocker is to point out that the earth rotating on it’s axis makes the stars appear to move.  Everything appears to rotate around the north star like a giant backwards twenty four hour clock.  Great, but since the clock is moving super slow, it’s not like you can look up and tell which one everything is turning around.  Therefore, being able to identify the north star is your first and most important sky skill.   Contrary to popular belief, the North Star (Polaris) is not a particularly bright star, and most people rely on the pointer stars from the Big Dipper to find it.

Circumpolar North

Since everything appears to rotate around the North Star, there is a disk of the sky that is visible all year round. The North Star is the center of this disk (or rather close enough).  The radius of the disk is equal to the distance from the North Star down to the horizon.  The further north you are on the planet, the higher the North Star appears in the sky, and therefore the larger the circumpolar region.  As you move south, the North Star gets lower, shrinking the size of the “always visible” disk.  Side Note: the angle from the ground to the North Star tells you your latitude.

This circumpolar region is your friend.  Learn the stars, constellations, and Greek mythology of this region.  It is time well spent.  Regardless of the season, you will always be able to show off your incredible knowledge of this always-visible region.  Focus on the Ursa Major (Big Dipper), Ursa Minor (Little Dipper), Cassiopeia, and Cepheus.  For extra credit, point out Thuban, a minor star that used to be the pole star long before the current one.

Zodiac Belt

The Zodiac Belt (aka ecliptic) is where the action is.  Because our solar system is relatively flat, with all planets circling in essentially the same plane, everything appears to pass through this belt.  The sun, the moon, and the planets all travel along this solar super highway.  The reason this is important is to keep you from looking like an idiot.  If you ever look for a planet outside this belt, you are in fact looking like an idiot.

Using your sky chart aides, you can determine if and where the five visible-to-the-naked-eye planets are located.  The five visible are Mercury, Venus, Mars, Jupiter and Saturn.  Mercury and Venus are on closer orbits of the Sun than Earth.  That means we have to look kinda towards the Sun to see them. Therefore, you can only see them just before sunrise or after sunset.  Mercury is ridiculously hard to see but Venus (the brightest object in the sky after the Sun and Moon) is often refereed to as the Evening Star or the Morning Star.  If you are looking for Mercury or Venus in the middle of the night, you are again looking like an idiot.  The other three (Mars Jupiter and Saturn) are in further out orbits of the Sun than Earth and therefore have the potential to be visible at any time during the night.

The ancients recognized the importance of this action packed belt, and started tracking where the sun was relative to the stars behind it.  This constellation / sun connection defines the calendar of the zodiac.

Constellation Description Date Brightest Star
Aries Ram Apr – May Hamal
Tarrus Bull May – Jun Aldebaran
Gemini Twins Jun – Jul Pollux
Cancer Crab Jul – Aug Al Tarf
Leo Lion Aug – Sep Regulus
Virgo Maiden Sep – Oct Spica
Libra Scales Oct – Nov Zubeneschamali
Scorpio Scorpion Nov Antares
Sagittarius Archer Dec – Jan Kaus Australis
Capricorn Sea Goat Jan – Feb Deneb Algedi
Aquarius Water Bearer Feb – Mar Sadalsuud
Pisces Fish Mar – Apr Eta Piscium

A challenge of being a Rock Star Gazer is that people will often say something like, “I’m a Libra.  Where is my constellation?”  This is where your study aid can help.  If you know during the evening of a particular month which Zodiac Constellation is rising and which is setting, you can approximate the location of the visible ones in between.  And for goodness sake, do not get caught looking outside the Zodiac belt for a Zodiac Constellation.

Southern Sky

The southern sky is like the astronomical clearance rack.  None of the major brand Zodiac constellations are available there.  None of the big wig wanders (Sun, Moon, or any planets) are ever caught passing through.  Unlike the consistent and reliable Circumpolar North, the Southern Sky is constantly changing with the seasons.  Here you may find little known irregulars such as Eridanus, Lupus, and Grus.

That’s not to say there aren’t some great deals in the southern sky, because there are.  The great hunter constellation Orion (a crowd favorite) is there every winter season.  The spectacular winter hexagon of stars (Sirus, Rigel, Aldebaran, Capella, Pollux and Procyon) are also on full display.

Star Showers

By C m handler (Own work) [CC-BY-SA-3.0 (www.creativecommons.org/licenses/by-sa/3.0)], via Wikimedia Commons
Meteor – Credit: C m handler
After slimming your way to Rock Star Gazer  status, you may feel the need to cleanse your soul with a meteor shower.  A meteor is a small piece of dust or dirt brilliantly burning up in our atmosphere.  Passing through the tail of an old dirty comet increases the chance of “dust ups” creating spectacular displays.  Some of the more common displays include:

Name Constellation Viewing
 Lyrids  Lyra  April 21-22
 Pereids  Perseus  Aug 12-13
 Orinids  Orion  Oct 21-22
 Leonids  Leo  Nov 16-18

Conclusion

To be a Rock Star Gazer is a great responsibility.  Simpleton star gazers will be looking up to you, then back at the stars, then back again to you.  Probably with a puzzled expression.  Your ability to speak confidently, if not actually competently, is critical.  Information is dangerous and you now have enough to be on the night time wilderness most wanted list.  Congratulations.

How To Pitch a Tent

Camouflaged Tent
Camouflaged Tent

There are a wide variety of tent shapes and sizes, each reflecting the personality and style of their owner.

In spite of their apparent differences, most tents are designed to solve a common fundamental challenge – how to efficiently protect the tent occupant from the elements.

A wilderness shelter can be thought of as a collection of layers, each with a specific purpose.

Eureka Tent
Eureka Tent

These typically layers include:

  • A relatively flat durable surface to provide stability
  • A tarp to serve as a moisture barrier and tent protector
  • A main tent body to provide insulation and protection from insects
  • Poles to provide structure and strength
  • And a rainfly for added protection from rain, sleet and snow
Sleeping Under Stars
Tarp Only – Under Stars

Depending on the weather conditions and your tolerance for adventure, you may or may not deploy all of these layers.  If the weather’s great and you like to sleep out under the stars, you may want to use only the tarp.  If weather’s great, but mosquitoes aren’t, you may setup a mesh tent with no rain fly.  If you are traveling ultra light, you may have only brought the tarp and rainfly, and left the tent body at home.

Rain Fly Only - Shelter
Rain Fly Only – Shelter

Regardless of what you deploy in the field, a good understanding of your layer options is critical.

Durable Surface

Selecting an appropriate location for your tent is the first step.  You want to make sure the location is safe, not in an area prone to rock slides, water runoff, lightening strikes or falling tree branches.

Durable Surface
Durable Surface

To decrease your impact on the environment, you should follow the leave no trace principle of camping on durable surfaces.  Select an area that is relatively flat.  You can remove surface stones, pine cones and sticks, but gone are the days of digging and excavating a tent platform.  Do not dig trenches.  They scar the environment and rather than protecting you from water runoff are more likely to create miserable muddy trenches and moats.

Moisture Barrier

Once you have established your ground layer, it is time to setup a moisture barrier. There are a variety of tarp options.  They may be designed specifically for your tent, including structural elements such as grommets and precise sizing.  In general, a tarp should be slightly smaller than your tent.  Tarps that stick out from your tent can actually catch rain water and moisture, and channel it right under your tent. That changes your tarp from being a water barrier, to a swimming pool liner.  If the tarp is too big, fold it under.

Tarp - Moisture Barrier
Tarp – Moisture Barrier

You can create your own tarp from hardware store plastic sheets.  6 mm thickness seems to be a nice balance between durability and weight.  I prefer clear plastic tarps because they make it easier to find and remove stray sticks and stones you missed when clearing the ground, but black works fine too. A tarp not only keeps ground moisture from making you cold, it also protects the bottom of your tent from damage and wear.  It is much cheaper to replace a tarp than a tent.

Tent Body

Tent Body
Tent Body

Tent bodies come in a variety of shapes and sizes.  When removing from the bag pay attention to how it was folded so it will be easier to repack later.  Some tents are folded in thirds, some in fourths, etc.  When spreading the tent out on the trap arrange the door in the direction you want, usually uphill.

Structure

Tent Pole Structure
Tent Pole Structure

Every tent needs a structure.  It may be old school poles pushing up on the tent, poles feed through sleeves in the tent body, or more popular now, free standing pole structures which the tent body can be clipped to and hung from. Most modern poles have a built in elastic cord which keeps the pieces together and ensure proper alignment. These poles are surprisingly flexible and strong, but fiberglass can break, and metal can bend if mishandled.

Stakes

Some tents require stakes to hold the poles in place, but most modern tents are free standing structures.  This means even after erected, the free standing tents can be moved and repositioned.  Stakes are required to keep these tents from being blown away in the wind, like giant and expensive tumble weeds.  To prevent stakes from being pulled out in the wind, they should be pushed in at an angle, somewhat perpendicular.  You may need to reposition the tent slightly if you encounter resistance from underground rocks.  Try to avoid pounding stakes into the ground with a rock.  They are likely to bend, and weaken.  Also, make sure your stakes do not become tripping hazards.

Rain Fly

Tent with Rain Fly
Tent with Rain Fly

A rainfly provides an additional layer of protection from severe weather such as rain, sleet and snow.  To be effective the rainfly should not come in direct contact with the tent body.  Where the rainfly and tent touch, water can seep through.  It is important to stake out the rainfly to maintain the proper spacing.  To avoid the buildup of condensation, many rainflys and tent bodies have vents.  Some rainflys also provide additional protection at the entrance in the form of a vestibule. The patio like covering can serve as a great place to keep your backpack or other gear dry.

Storage

Brush out the tent before taking it down.  Free standing tents can be picked up and shaken over your head, letting the debris fall out the unzipped door.  Just watch your eyes!  Tents stored wet will develop musty mold, shortening their life and making them miserable to sleep in.  Whenever possible, tents should be taken down and packed away completely dry.

Before putting a tent back into long term storage, it should be set up in a controlled environment and throughout checked out.

  • Wipe down any dirt
  • Verify poles are correct and in working order
  • Very the number of stakes and tie down ropes
  • Check for and make any minor repairs to zippers and seams
  • Make sure tarp, tent and rainfly are thoroughly dry before re-packing.

When well maintained a tent should provide years or sound sleeping service.

Practice

These guidelines are generally true for most tents, but you specific setup may be slightly different.  Follow the manufacture directions and check out our demonstration videos to see if your specific tent is covered.  Better to struggle setting up a tent in the comfort of your own backyard or living room, that to find problems in the wilderness.  Practice makes perfect, and will help ensure you pitch a tent, rather than pitching a fit.

How To Poop in the Wilderness

When You Gotta Go, You Gotta Go

This is without doubt the number one or number two challenge in the wilderness.  Many of us wish we could avoid the subject, but in the end, it’s not our call; it’s nature’s call.  Try as we might, there is simply no avoiding voiding.

Does a Catholic bear poop in the woods? And what about the Pope?  What does he do? This picture ought to remove all doubt.  Or at least some of it.

Bear Scatt
Bear Scatt

If it is not of bear, it certainly bears something ickumenical.

Hygiene

There are standard hygiene practices which should be followed in the wilderness.  Although urine is relatively sterile, most of us do not want it in or near our water.  After all, this is the same water we use for our hot chocolate, coffee, and pea soup.

Feces carry pathogens which can make their way into our body via various routes including hand-to-mouth-contact or soiled-water.   After doing your business, it is highly advised that you wash your hands far from any water source.  To decrease the odds of contamination, the US Forest Service recommends disposing of human waste:

far from lakes, streams, and campsites–at least 100 feet (200 feet recommended).

Options

Knowing that our call of the wild may be just around the corner, what are our options?

Avoidance Option

The avoidance option is simple: don’t go.  And by don’t go I mean don’t go in the wilderness.  For health reasons, it is better not to go in the wilderness, than to go in the wilderness and not go.

Number 1 Option

It seems nature was kinder to men than women, at least regarding equipment to support  option number 1.  You might say that women got hosed, but it turns out it was actually the men.   Marketeers have funneled in to provide women aiming options mother nature simply missed.  These funnel products and their names are real.  You can not make this stuff up.

  • GoGirl (www.go-girl.com)
  • SheWee (www.shewee.com)
  • Magic Cone (www.magic-cone.co/)
  • Urinelle (www2.urinelle.eu)
  • WhizFreedom (www.whizfreedomusa.com)

You realize of course what this means.  When you see Jerry or Terry or Sam written in the snow, you’ll be left wondering if it was a he-weer or a she-weer.

Note:  You can find YouTube demo videos for these products, and no I am not providing those links.  Even I have to draw a line in the snow.

Number 2 Option

Cat Holes

Cat hole for human waste
Cat hole

For most wilderness settings, cat holes are the preferred method of human waste disposal.  A cat hole is a 6 to 8 inch hole dug in the ground with a small travel trowel.  In this wilderness version of putt-putt, your goal is to make a hole-in-one.  Efforts requiring several strokes with a stick are rightly shrouded in shame.

The theory of a cat hole is that it should be dug in bacteria rich soil which will help breakdown the waste.  Burying waste in a cat hole also spares the rest of us the sights and smells of your latest production.  In some areas, toilet paper can be buried along with your waste.  In other areas, it may need to be burned or packed out.

In the Trenches

Rather than individual cat holes, some backpackers prefer a group latrine.  This does not mean the backpackers go together at the same time, but it does mean they share a common location.  This typically involves digging one long trench.  Each person who uses the latrine makes a deposit at the end of the trench and buries it, leaving the remainder of the trench for future customers.  The downside to this approach is that rather than scattering the impact over a broad area (as with individual cat holes) it concentrates the human waste.   On the plus side, however, it may be easier for some children or inexperienced packers.  They do not need to figure out where or how to dig, and if they do not cover their load properly others are likely to discover and correct.

DogPiles

Believe it or not, there are some people who rationalize a dogpile technique.  Rather than digging a hole they simply make a surface deposit.  The theory is that exposure to direct UV light will accelerate the decomposition of the human waste.  In fact, some go so far as to recommend increasing the UV surface area by use of a smear campaign.   Suffice it to say I do not think you will see official literature recommending this approach.  I have a feeling most people that use this technique are also known as “solo hikers.”

Doggie Bags

In some environmentally sensitive and high traffic wilderness areas personal deposits are no longer legally accepted.  In other words, after you are done holding it, you will still need to be holding it, only now in your own personal carry on bag.  By the way, contrary to perhaps other times in your life, if someone offers you paper or plastic, choose plastic.  Pack It In and Pack It Out has just taken on a whole new meaning.

Technique

As an experienced cat-holer I offer the following advice:

  • Dress Appropriately.  What you are about to do will probably involve taking off some clothes and perhaps your shoes.  Shorts and sandals are easier to deal with than long pants and high laced boots.
  • Toilet Trowel and Paper
    Toilet Trowel and Paper

    Take The Necessary Equipment.  You will want a small trowel, toilet paper, and hand sanitizer.  If you are near mosquitoes you may want to apply insect spray to certain areas before you get out there.

  • Seek Higher Ground.  You should plan to be at least 200 feet from camp, trail, or water.  Given a choice go uphill.  It is better to find a place where you can look down on others, rather than the other way around.  Besides, windier high points have fewer insects.
  • Find an Appropriate Dig Site.  You want soft bacteria rich soils.  Do your best to avoid roots and rocks, which make digging difficult.  Watch for ant hills.  The soil may be easy digging, but the resulting frenzy may be more than you bargained for.
  • Dig a 6-8 inch deep hole.  The depth of the hole is to ensure you get down to the proper soil and have room to bury your offering.  The width of the hole will depend on the size of your burden, but 6 inches is usually enough.
  • Clear the Runway.   Take time to remove tall grasses, sticks, twigs, or other things that may rub you the wrong way when you squat.  Do it before you remove your clothing.
  • Toilet Paper within Reach.  Keep toilet paper within reach and in its plastic bag until you are ready.  After you have started is not a good time to realize you left the paper way over there.
  • Remove your clothing.  Do not simply drop your pants to your ankles and expect a successful outing.  Get your pants and underwear completely off and out of the way.  The last thing you want is a constant reminder all over your clothes.
  • Balance and Aim.  Straddle the hole and squat.  You may want to put a hand down on the ground for balance.
  • Be Patient.  Do not expect results right away.  Stage fright takes on a whole new meaning in this position.  Also, many people have delayed this moment so long that it may take a while to get it going.  Look around.  Enjoy the view.  The wilderness is spectacular.
  • Adjust Your Aim.  If you do miss, shift your position.  This is a skill you will acquire over time.
  • Cat Hole with Paper
    Cat Hole with Paper

    Use Toilet Paper Sparingly.  Be mindful of the days left and the number of people sharing the paper.  Leaves and soft pine cones can be used, but they are not my first choice.  If appropriate for your location, deposit toilet paper into the hole.  You can also use it to guide any off target items into the hole.

  • Get Dressed.  Most people feel uncomfortable naked in the wilderness, so will want to put clothes back on quickly.  Others may relish the cool breeze.  The sense of urgency is up to you.
  • Cat Hole Covered
    Cat Hole Covered

    Bury your Evidence.  Fill the hole with the dirt you removed creating the hole.  Many people like to place a large rock on the spot to discourage animals from digging it up.  Just remember, the rock you just pick up may be the marker from the previous persons efforts.

  • Wash Your Hands.  Use hand sanitizer.
  • Declare Victory.  Congratulations.  Now go back and join the group.  They are all probably waiting to hear how it went.


How To Avoid and Escape Avalanches

If you ever wondered what it’s like to be swept up in a snow avalanche, watch this 9 minute “point of view” video from Verbier Switzerland in Feb 2011.  The fact that it is only 9 minutes long is very good news.  It takes about a minute and a half for the skier to get swept up in the avalanche.  It is not until about five minutes later that his friends finally break through to him.  If this video were much longer the rescuer’s face at the end would surely be minus the smile.

Avalanches are the ultimate in equal opportunity.  They don’t care if you are downhill skiing, cross-country skiing, snow shoeing, mountaineering, or snowmobiling. Given the right conditions they appear quite happy to crash your party.

Although they may appear as unpredictable as earthquakes, lightning strikes, and lottery tickets, there is a science to snow avalanches.  There are four things generally required for an avalanche:

  • A slab of snow
  • An unstable or weaker layer below
  • A steep slope (between 30-45 degrees)
  • A trigger event
Lawine - WikiMedia Commons: Public Domain
Avalanche – Credit Lawine

Unfortunately, those 4 conditions are not that difficult to meet.  Therefore, anyone intentionally heading into avalanche country should, like a boyscout, “be prepared“.  In the simplest form, there are two main objectives.

  • Avalanche Avoidance
  • Rescue / Recovery

The obvious goal is to do avoidance so well that rescue is never required.  Proper planning, understanding risks, reading the warning signs and making the right decisions greatly increases your odds of having a smile at the end of your own outdoor snow movie. Because we are not born with these avalanche skills, acquiring them requires some form of training.

Avalanche Research and Education

There are several organizations dedicated to avalanche research and education. Two of the main ones in the US are:

Prior to their existence, there were no real standards for Avalanche training curriculum in the United States. AIARE has defined a multi-leveled training program, which many wilderness training organization deliver.

  • Avalanche Awareness (1-2 Hours)
  • Introduction to Avalanche Safety (1-2 Days)
  • Level I (3 Days) – Focused on Decision Making
  • Level II (4 Days) – Focused on Analyzing Snow Stability and Hazards
  • Level III (7 Days) – Focused on Advanced Professionals

As a quick starting point, you may consider this online awareness tutorial:

https://www.avalanche.org/tutorial/tutorial.html

Avalanche Equipment

In addition to skills, you also need to have and know how to use proper equipment.  This includes the things you would expect in other outdoor activities such as helmets, first aid kits, repair kits, food, water, etc.  But it also includes very avalanche rescue specific equipment such as:

  • beacons – electronic transmitters/receivers to help rescuers identify the above snow location of a buried victim
  • probes – extendable poles to pinpoint the victim’s location under the snow
  • shovels – tools to dig the victim out, with a goal of freeing an airway
Avalanche Wikimedia Commons: Schneebrett-PublicDomain
Avalanche Credit Schneebrett

Imagine you are living the scenario in the Verbier Avalanche video.  Research shows you have about 15 minutes to:

  • Realize you have lost a party member
  • Confirm the search area is safe
  • Switch your beacon transmitters to rescue mode
  • Perform a primary and secondary beacon search
  • Pinpoint victim location with a probe
  • Dig the victim out with shovel
  • Establish an airway
  • Administer first aid

All of this requires a great deal of training and practice.  Unfortunately, the survival rates can be depressingly low.   If swept up, you should do everything possible to stay on or near the surface.  Point your feet down hill, dig in, swim and fight to stay on the surface.  According to avalanche.org, if you get completely buried your chance of survival is only 30%.  It quickly becomes clear why avoidance is preferred to rescue.

Avalanche Warning Signs

The first signs to watch for to avoid an avalanche are the signs provided by professionals.   There are teams of professionals who regularly survey the snow and provide avalanche risk advisories and bulletins.  A great place to check is:

https://www.avalanche.org

They provide links to various Avalanche Centers, including some in North America, Europe, New Zealand and Argentina.  In North America, the following warning system is used to indicate danger levels:

Avalanche Danger Scale
  • Extreme and High Danger areas should be avoided completely.
  • Considerable Danger areas require advanced training in snowpack evaluation, routes and decision making.
  • Moderate and Low Danger requires the ability to read warning signs and local conditions.

If after reading the bulletins you still decide to venture out, you should be watching for the classic danger signs.   These are often refereed to as the Red Flag Warnings:

  • Signs of Recent Avalanches – The most accurate indication of avalanche danger is sign of a recent avalanche.  The risk is clearly no longer theoretical.
  • Signs of Unstable Snow – Cracks, hollow sounds, and “whumping” are clear sign of instability.  “Whumping” is the sound made when a section of snow collapses onto itself.
  • Intense Precipitation – A significant build up of fresh snow or rain can create very unstable conditions.
  • Wind Blown Snow – Even if there has been no recent precipitation, snow moved by wind activity can load the leeward slopes, causing a similar instability.
  • Rapid Temperature Rise – quick temperature changes can cause snow to shift and slip, becoming less stable

Conclusion

Participating in snow sports can be a blast.  That blast may be the adrenaline rush that comes from skiing, snowboarding,  snowmobiling, or mountaineering in the great outdoors.  If, however,  you are not appropriately trained to read the warning signs and make good decisions, that blast may be from a freshly triggered avalanche.  This unintended rush of more than just adrenaline may bring new meaning to the term “ride of your life.”